- Introduction
- Premise: Introduction
- What Is the Orthocenter of a Triangle?
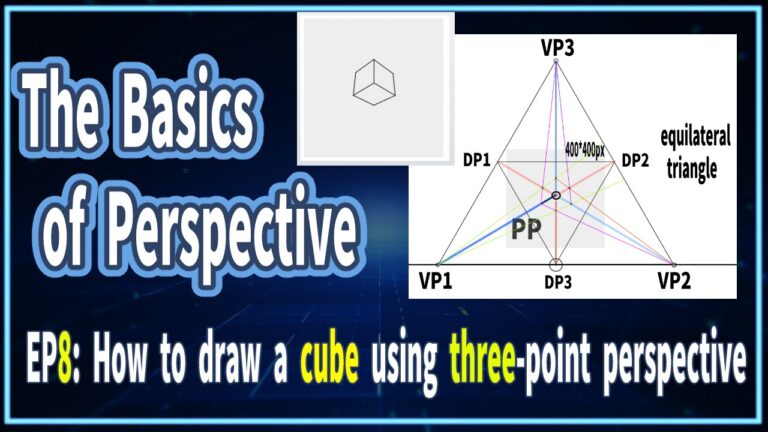
- A Case of Three-Point Perspective Using an Equilateral Triangle
- Finding the Gravity Line and the Station Point in Three-Point Perspective
- How to find the third vanishing point
- How to Determine the Cone of Vision in Three-Point Perspective
- How to Find the Measuring Point and the Diagonal Vanishing Point in Three-Point Perspective
- 【Application】Creating a Correct Cube with the Three-Point Perspective of Other Triangles
- [Advanced] Creating a Three-Point Perspective Grid
- References
- Books that are easy for beginners to understand
- David Chelsea「Extreme Perspective! For Artists: Learn the Secrets of Curvilinear, Cylindrical, Fisheye, Isometric, and Other Amazing Drawing Systems that Will Make Your Drawings Pop Off the Page 」
- Robbie Lee「Perspective Made Easy: A Step-by-Step Guide」
- Scott Robertson「How to Draw: drawing and sketching objects and environments from your imagination」
- About the Japanese version of this article
- Books that are easy for beginners to understand
Introduction
Explanation in the video
The ‘Overview, Summary, or Conclusion’ of this article can be found at the beginning of the YouTube video, so please refer to it.
If possible, we would appreciate it if you could subscribe to our channel to help maintain the site. It serves as motivation for us!
Premise: Introduction
It is difficult to accurately draw a cube by hand using three-point perspective.
・It is difficult to draw an accurate cube using three-point perspective by hand.
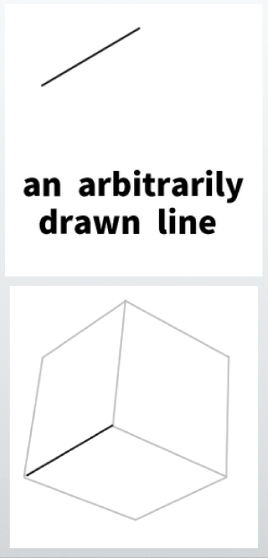
For example, imagine drawing some random slanted lines on a canvas.
In three-point perspective, all the edges of a cube appear as slanted lines—there are essentially no true vertical or horizontal lines.
So then, how can we draw the remaining slanted lines, which should be the same length as the first one, if we’re working without precise measurements?
In three-point perspective, there’s a clear difference in difficulty between simply drawing a cube and drawing a perfect cube.
For example, drawing a building, a house, or a person in a way that roughly looks like three-point perspective is relatively easy.
However, drawing something with precise proportions—such as an architecturally accurate cube—is much more difficult.
In fact, drawing a human figure, which has organic curves, with that level of precision would be nearly impossible.
That said, not everyone who draws is expected to achieve such accuracy in the first place.
And of course, accuracy doesn’t necessarily mean beauty.
Still, being able to start with a precise drawing and then simplify or stylize it into a beautiful one is a valuable skill.
In professional work, accurate drawings are sometimes required—not only for architects, but also for designers.
Learning analog perspective to develop a sense of three-dimensionality.
Of course, drawing cubes in three-point perspective is much easier when working digitally.
For instance, Clip Studio Paint has a perspective ruler, and Photoshop offers similar features.
Architectural design software includes even more advanced and convenient tools.
In professional settings, it’s common to build these structures primarily using a computer.
So if your only goal is to produce an accurate drawing, then learning how to use digital tools is the most practical approach.
However, if your aim is to understand the principles of perspective, to find a way to draw by hand, or to develop a sense of three-dimensional space,
then these digital tools should be seen only as supportive aids for learning—not the main focus.
What Is the Orthocenter of a Triangle?
Knowledge of geometry is necessary for drawing.
To begin learning three-point perspective, you need at least a basic understanding of geometry.
As someone from a humanities background, I personally have little knowledge of geometry.
For people like me, this becomes a kind of mental barrier.
And I suspect that many artists turn back when they encounter this barrier.
It’s not just that geometry feels tedious—it’s that they simply can’t understand it,
and that’s why they tend to avoid perspective drawing altogether.
After all, it’s hard to stay engaged with something you truly don’t understand.
It’s not just that geometry feels tedious—it’s that they simply can’t understand it,
and that’s why they tend to avoid perspective drawing altogether.
After all, it’s hard to stay engaged with something you truly don’t understand.
Strictly speaking, you don’t need to know geometry in order to draw.
However, I believe that having some knowledge of geometry can definitely help you improve your drawing skills.
That said, please don’t worry—
we won’t be diving into any complicated or advanced geometry.
We’ll be dealing with simple concepts, the kind you probably learned in elementary school.
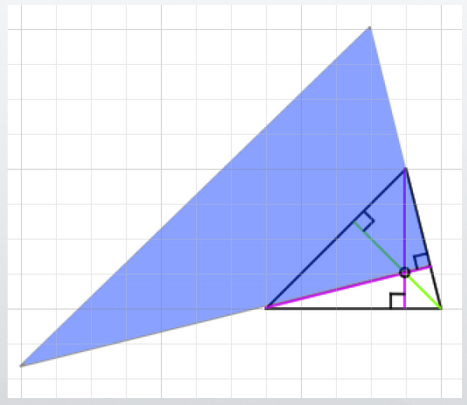
The orthocenter theorem of a triangle: meaning, definition, and a clear explanation.
POINTThe Orthocenter Theorem of a Triangle:In any triangle, the perpendicular lines drawn from each of the three vertices to the opposite sides (or their extensions) all intersect at a single point.
This point of intersection is called the orthocenter.
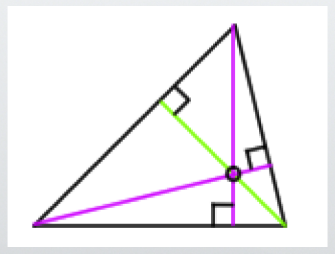
In a diagram, it would look something like this.
Each of the three perpendicular lines forms a 90-degree angle with the opposite side.
Even though you can use a straightedge to draw straight lines,
that doesn’t guarantee the lines you draw will be at a 90-degree angle.
Here, “90 degrees” is a relative measure—it means the line must be perpendicular to a specific side of the triangle.
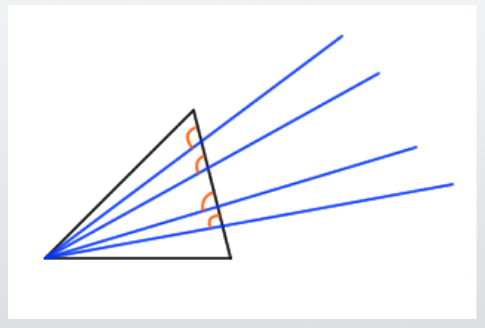
For example, in the diagram on the right, the blue lines are all straight,
but none of them can be said to form a true 90-degree angle relative to the opposite side.
When finding the orthocenter, there is generally only one line from each vertex that forms a right angle with the opposite side.
How to draw a straight line from each vertex to the opposite side.
As someone from a humanities background, I have to admit—I don’t fully understand what it means to “draw a straight line down from each vertex to the opposite side.”
How exactly am I supposed to draw it straight and correctly?
Apparently, there are two main tools you can use: a compass or a set square.
Personally, I’m skipping the compass for now, since many types tend to leave holes in the paper (although some don’t).
So in this case, I’ll be using a set square—a right-angle triangle ruler.
You could also use a protractor if needed.
That said, compasses are actually quite useful.
They’re especially important when drawing circles, which is a big part of constructing scenes in three-point perspective.
If this blue triangle represents a set square,
you can line it up precisely like this to draw a clean and accurate perpendicular line.
If you don’t have a right-angle triangle ruler,
you might be able to use two regular straightedges instead.
And if you don’t even have those,
you can get creative—fold a piece of paper to make a right angle,
or use two books placed together to create a 90-degree edge.
You can draw the remaining lines in the same way.
It’s a good idea to draw all three, since we’ll need them later—
although technically, you only need two lines to find the orthocenter.
Relationship between the orthocenter and three-point perspective.
Now that we have found the orthocenter,
how is it related to three-point perspective?
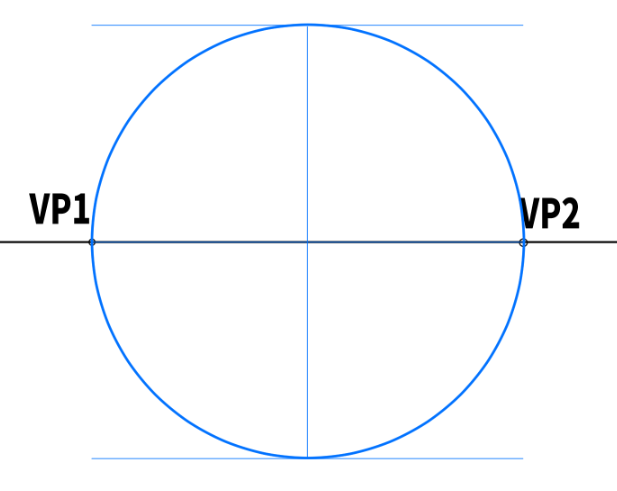
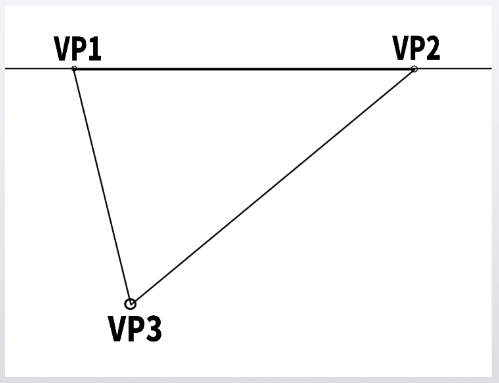
In three-point perspective, the three vanishing points form a triangle.
The center of this triangle becomes the center of the screen.
That means the orthocenter becomes the center point of the image, also called the CP or VC.
(Of course, the final drawing doesn’t always have to be centered on the orthocenter, but placing it there often leads to a more balanced composition.)
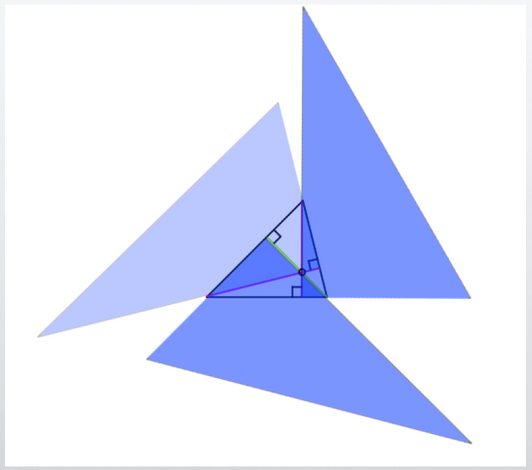
Next, we face the question of what kind of triangle shape is ideal,
and how the triangle should relate to the screen.
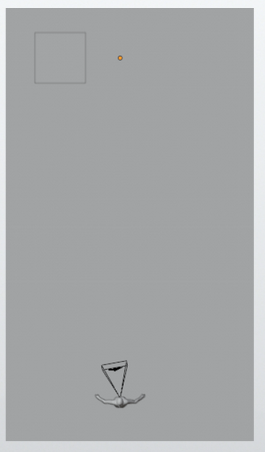
For now, we will focus on the simple case of an equilateral triangle,since it’s easy to construct.
Once you’re used to it, it’s quick to draw,
but the problem is that it might not match the angle you want to draw.
Just like when you take a photo and try different angles to bring out the best in your subject,you also need to think about the angle of the triangle in three-point perspective.
(Technically, there are billions or even trillions of possible variations,but in practice, only a handful are commonly used.)
However, constructing anything other than an equilateral triangle can be quite difficult and time-consuming.
That said, as we’ll see later, once you’ve created one, you can reuse it,
which means the more you make, the more your library grows—and the easier it gets.
It’s also possible to set up beautiful three-point perspectives
by using photos or illustrations with appealing angles as references.
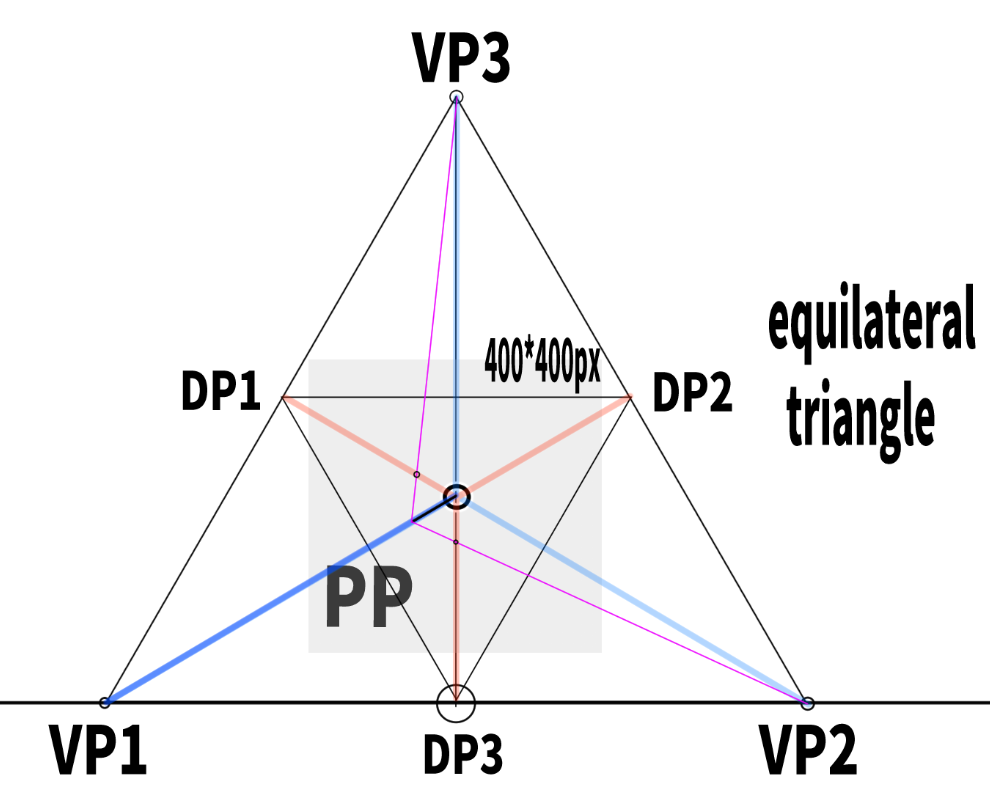
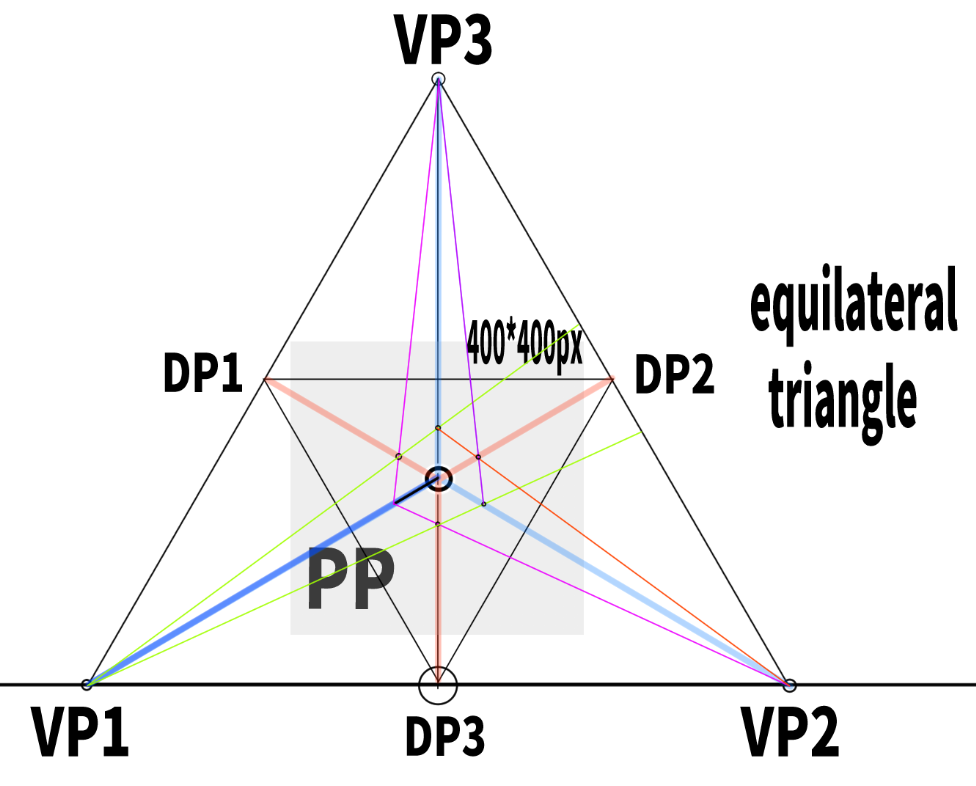
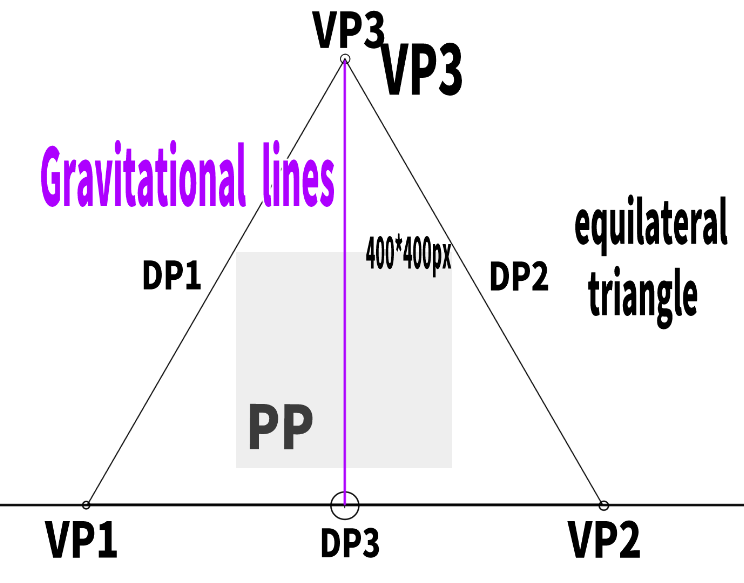
A Case of Three-Point Perspective Using an Equilateral Triangle
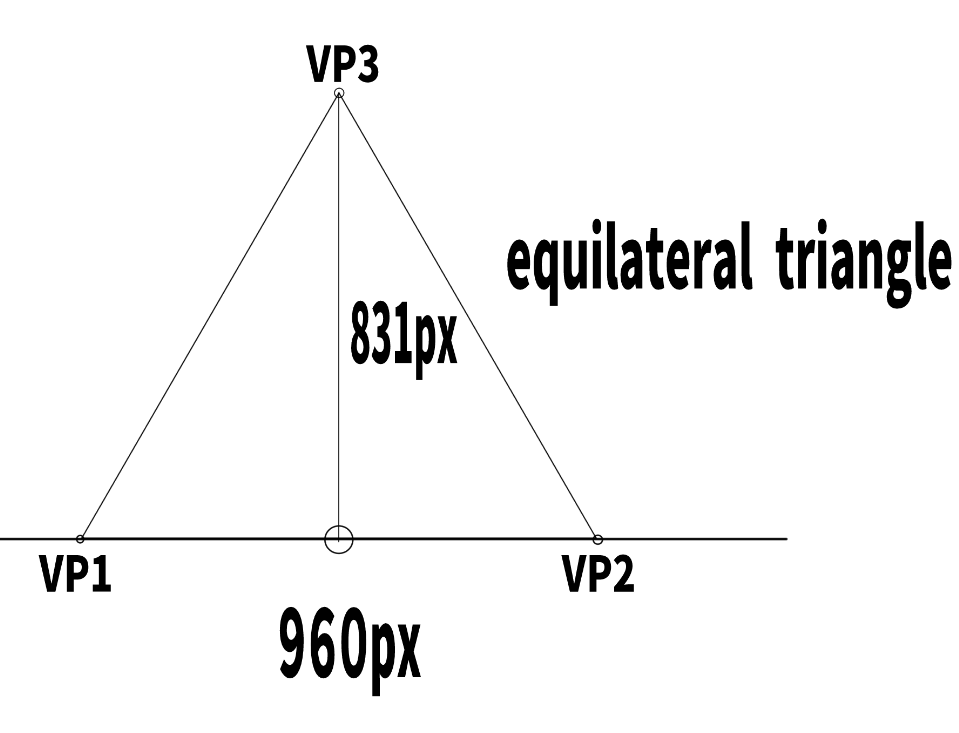
How to construct an equilateral triangle.
POINTequilateral triangle:a triangle in which all three sides are the same length,
and all three interior angles are equal.Each angle is typically 60 degrees.
Find the height of an equilateral triangle.
If there are two vanishing points like this, how is the third vanishing point (either up or down) determined?
The height of an equilateral triangle is found by the formula (a × √3) / 2, where a is the length of one side.
If the distance between the two vanishing points is 960 pixels,
then (960 × √3) / 2 = 831.
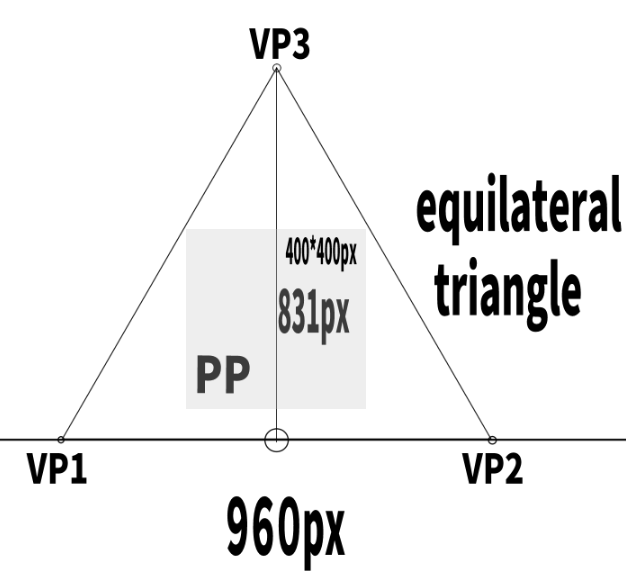
If you set the screen (PP) inside this equilateral triangle,
the most basic and simplest three-point perspective will be created.
I tried constructing a 400*400px screen.
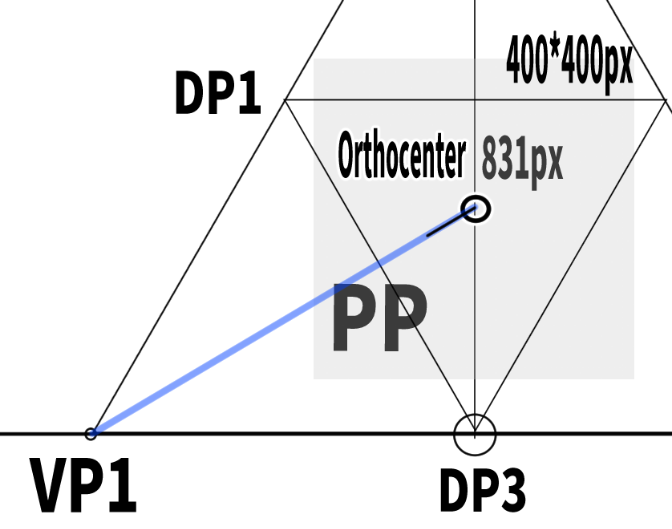
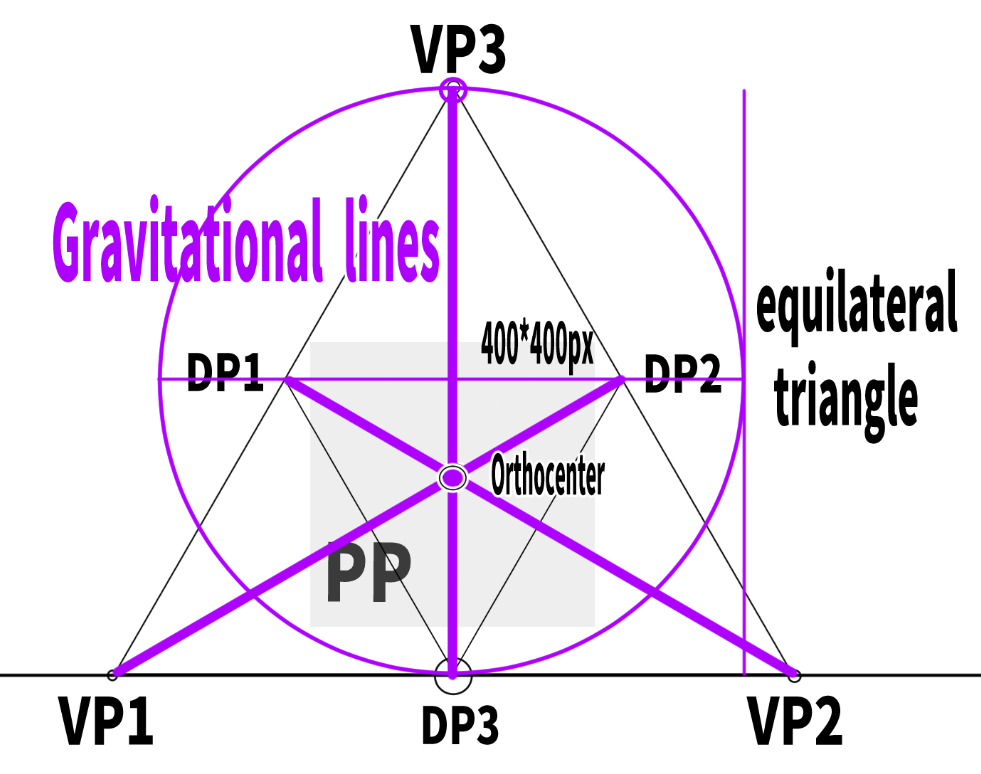
How to find the orthocenter of an equilateral triangle.
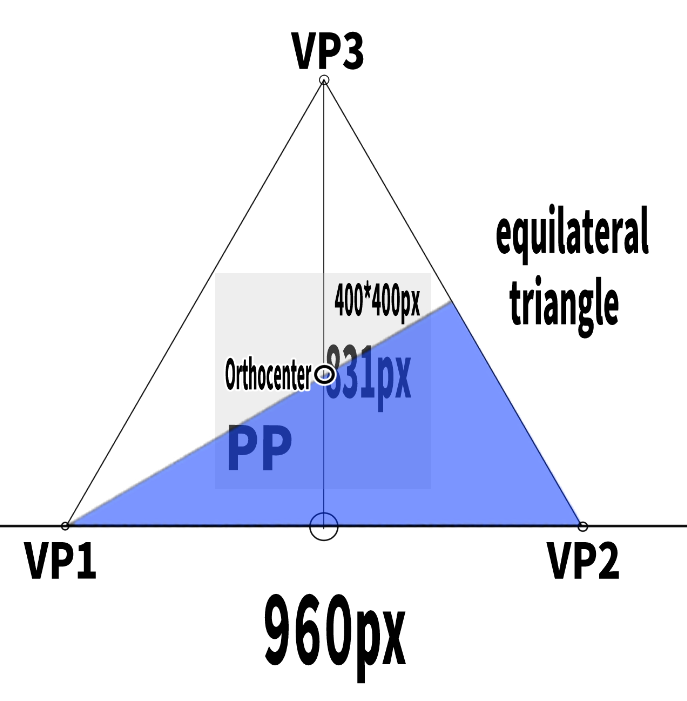
Now, where is the orthocenter of this equilateral triangle?
By using a right triangle, we found that it is located here.
Equilateral triangles have a useful formula:
the intersection point appears at about 1/3 the height of the triangle.
In this case, 831 ÷ 3 = 277, so the orthocenter is located around there.
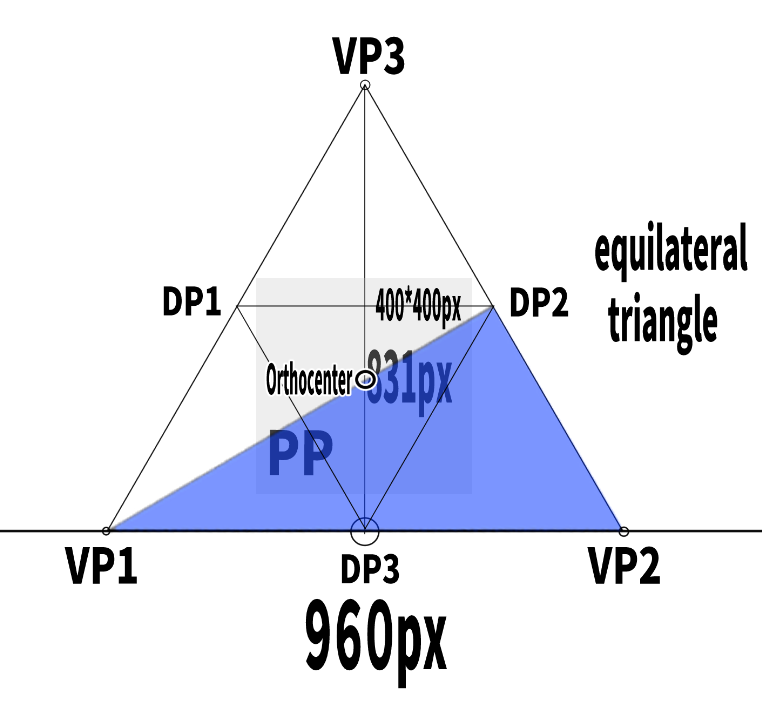
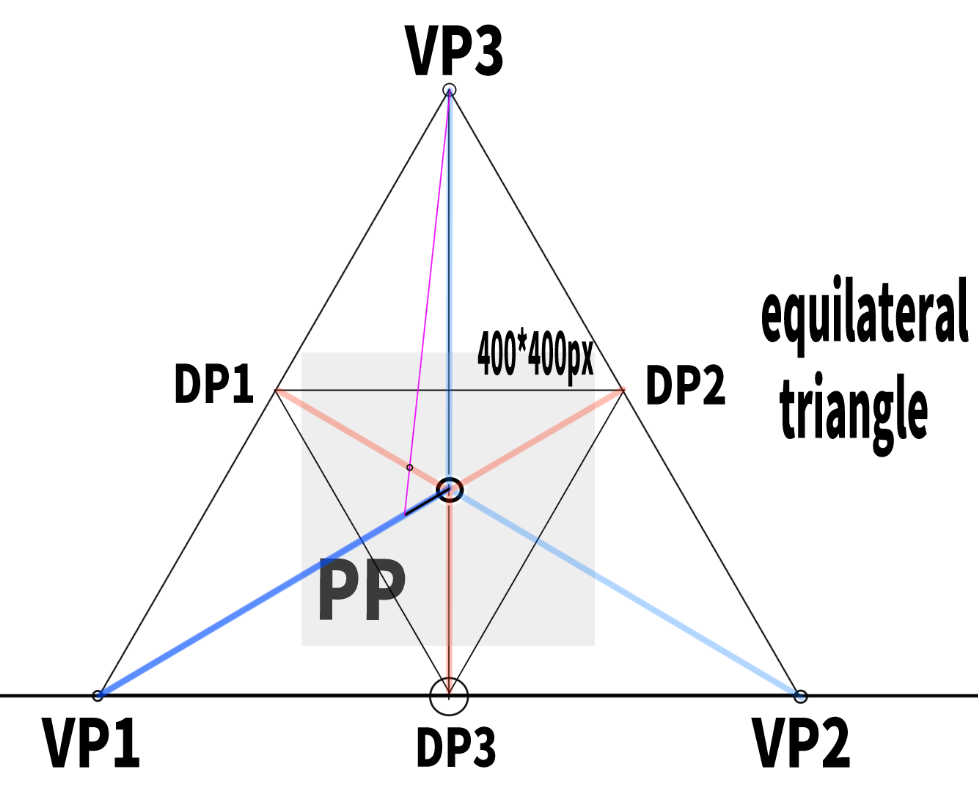
“If you construct an inverted triangle inside,
you can determine the positions of all three diagonal vanishing points (DP).
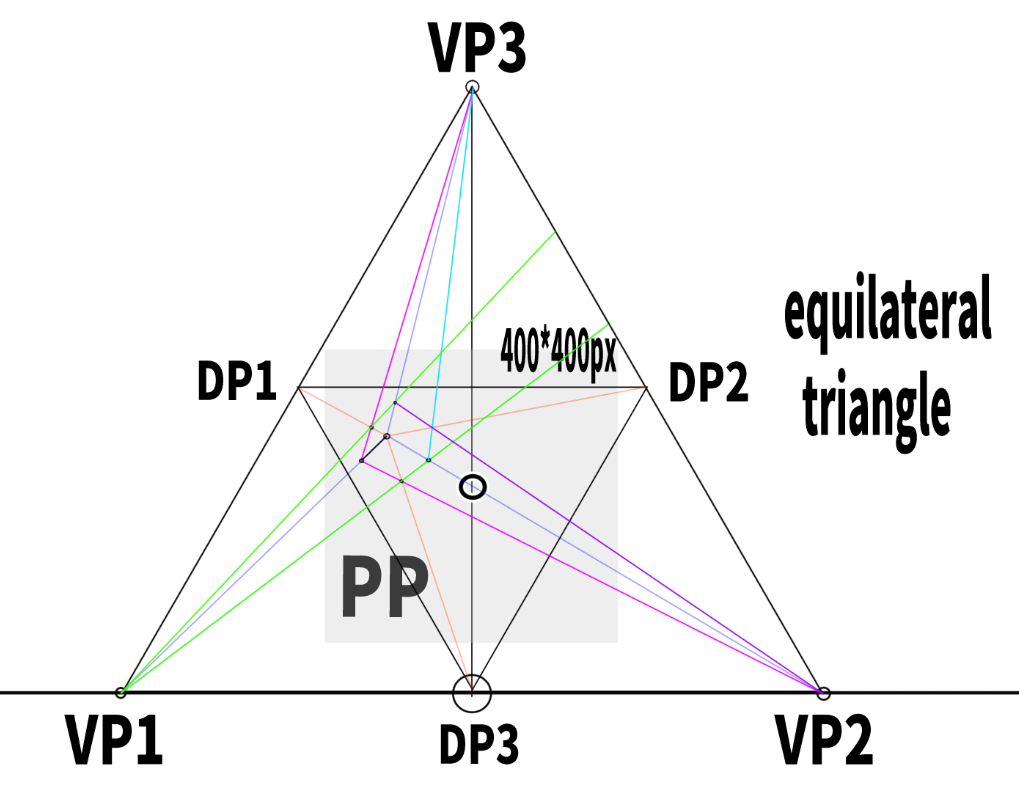
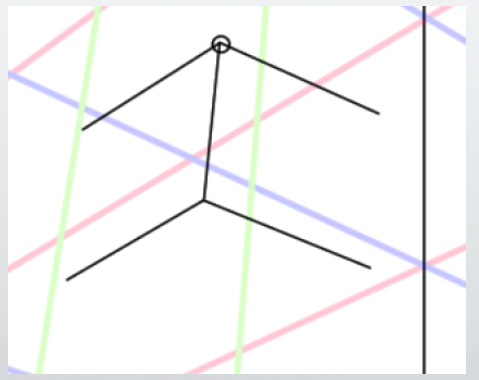
How to draw a cube using the three-point perspective of an equilateral triangle.
For example, try extending a diagonal line of arbitrary length from any point toward VP1 (vanishing point 1) through the orthocenter.
The challenge is how to draw the remaining diagonal lines with the same actual width as this one.
Next, extend a line from the initial diagonal toward VP3,
and find the point where it intersects with the guideline.
In analog drawing, instead of drawing every line,
you might use a string or a perspective ruler to extend the line.
Extend a line to VP2 as well,
and find the point where it intersects with the guideline.
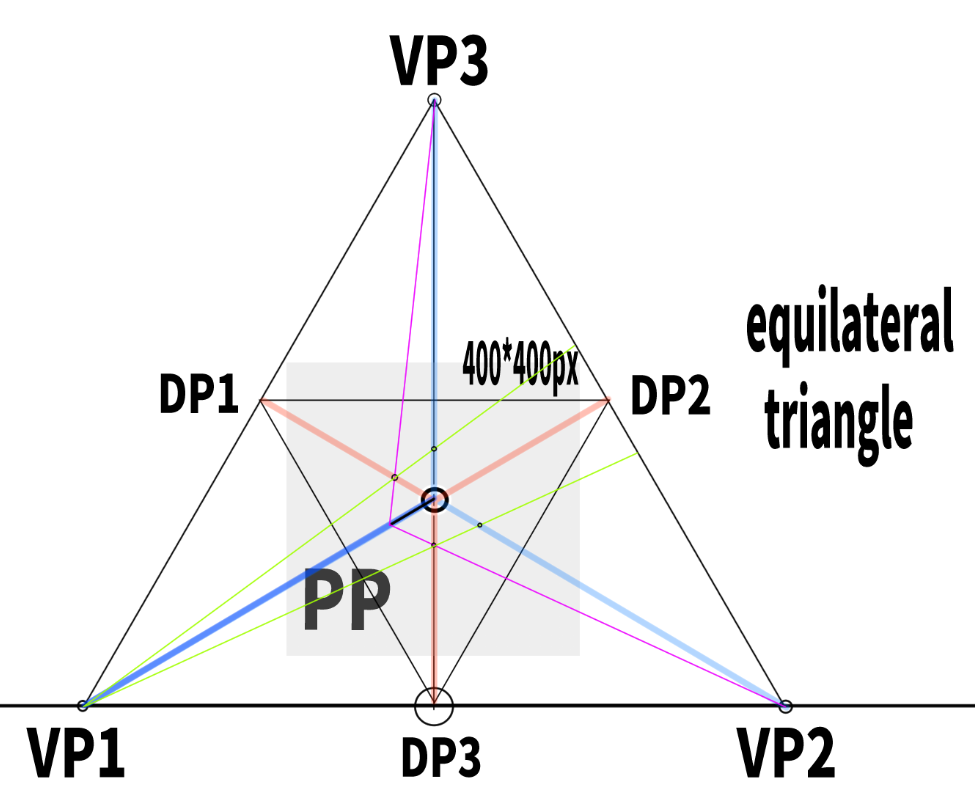
Extend a line from VP1 to the two points you set earlier.
This will allow you to find two more points where the guide lines intersect.
Similarly, extend a line from VP2.
Furthermore, by drawing a line towards VP3, the lengths of all the edges will be determined.

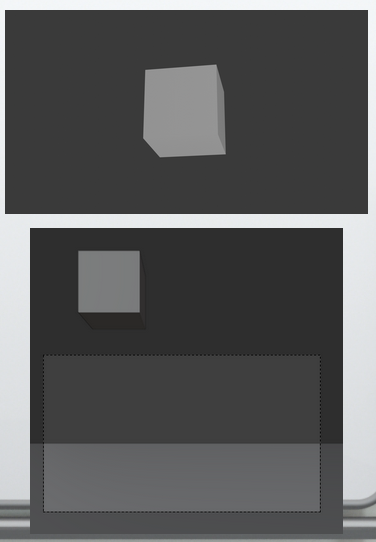
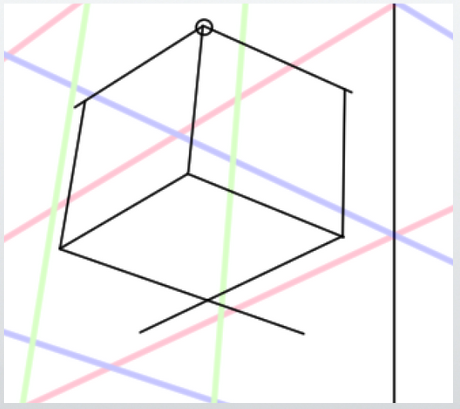
The completed cube is here. It looks like a relatively clean cube, doesn’t it?
I tried making a different cube as well.
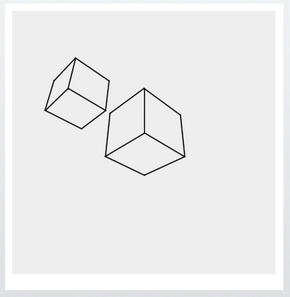
When you make it neat, it looks like this.
However, there are still many unknowns. For example, where is the vanishing point (SP)? Where is the visual cone? What happens with other triangles? How does it relate to other perspective systems?
There are a lot of questions to answer.
Finding the Gravity Line and the Station Point in Three-Point Perspective
Gravity line: what it is, its meaning, definition, and an easy-to-understand explanation.
Based on the previous example using an equilateral triangle, we will now identify the gravity line.
POINTGravity line:A vertical reference line that represents the direction of gravity, showing the upright orientation of objects on the screen.

Gravity, simply put, is the force by which the Earth pulls objects downward.
For example, when you release an apple from your hand, it falls down toward the ground.
In space, this kind of gravity is absent, so the apple doesn’t fall downward ― gravity there is so weak it’s barely noticeable.
How to find the gravity line in three-point perspective.
In the case of three-point perspective,
if you draw a vertical line from the upper or lower vanishing point,
that line becomes the gravity line.

Apparently, not only vertical but also diagonal lines can be considered gravity lines.
For example, a slanted line like this one is also a gravity line.
Now that we understand what gravity lines are,
how do they relate to the actual drawing process?
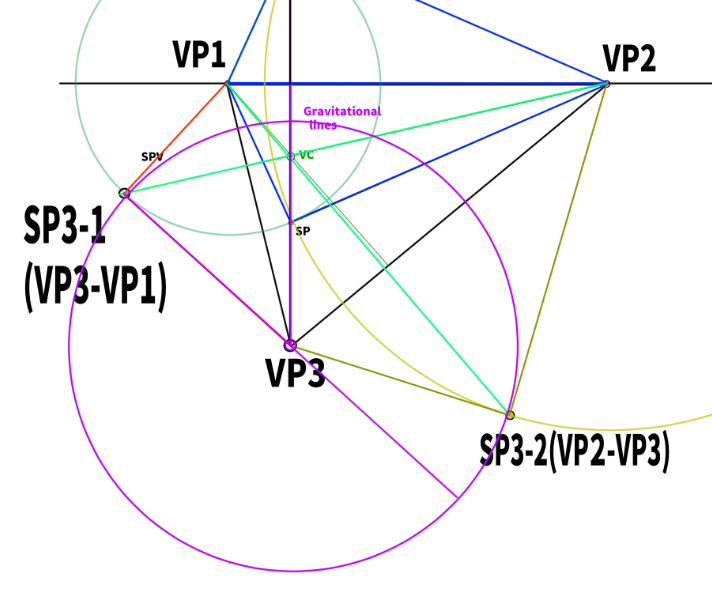
How to find the station using the gravity line.
A gravity line can be used to determine the position of the station point (SP)—more precisely, the station point in the side view.
Using the width between the gravity lines as the diameter,a circle is drawn.
This can be done with a compass, or by constructing the circle inside a square.
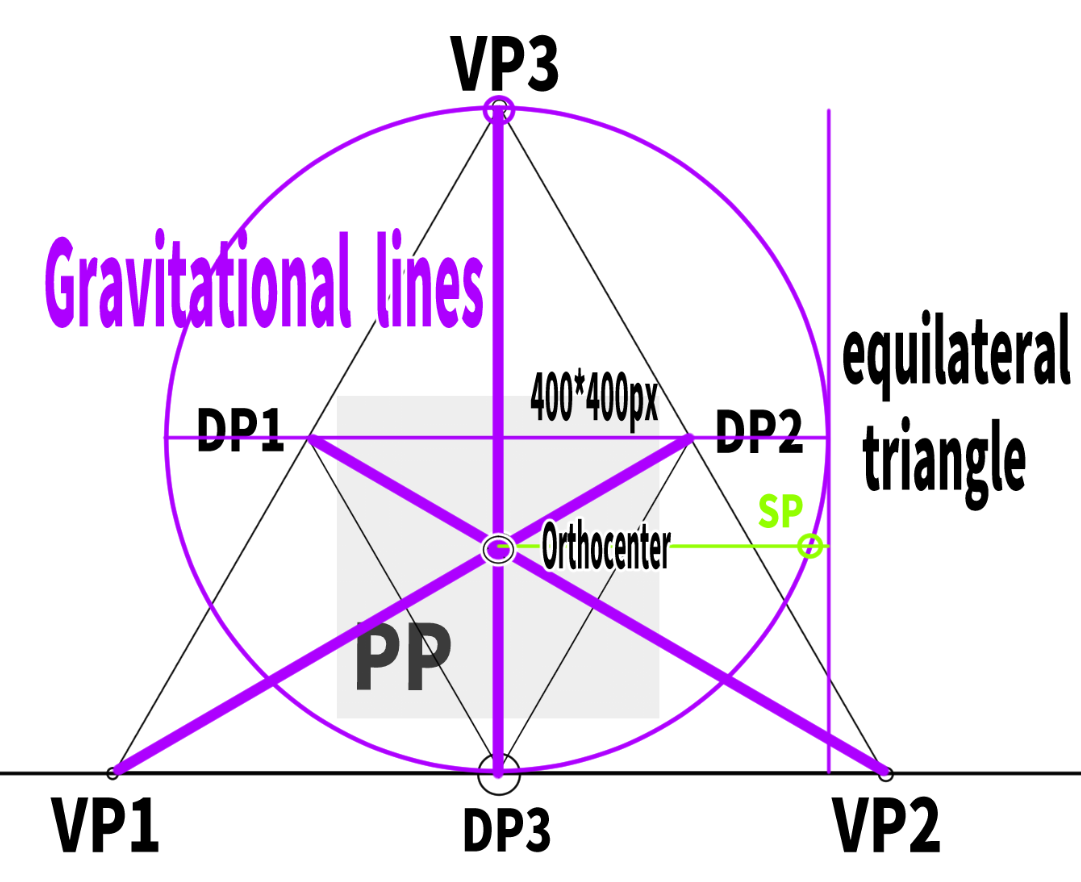
Thus, the position where the circle created intersects with the line drawn horizontally from the orthocenter becomes SP.
My mind is full of question marks, but for now, let’s move forward (the concept of the vanishing point in the side view will need to be understood later).
The relationship between the vanishing point and the visual cone is still a mystery. For now, I will just focus on how to find the position of the SP.
What are the angle of elevation and the angle of depression? Meaning, definition, and a clear explanation.
POINTElevation angle:The angle of looking upward.
POINTDepression angle:The angle of looking downward.
I will introduce how to find the elevation angle and depression angle in the context of three-point perspective. A protractor is generally required.
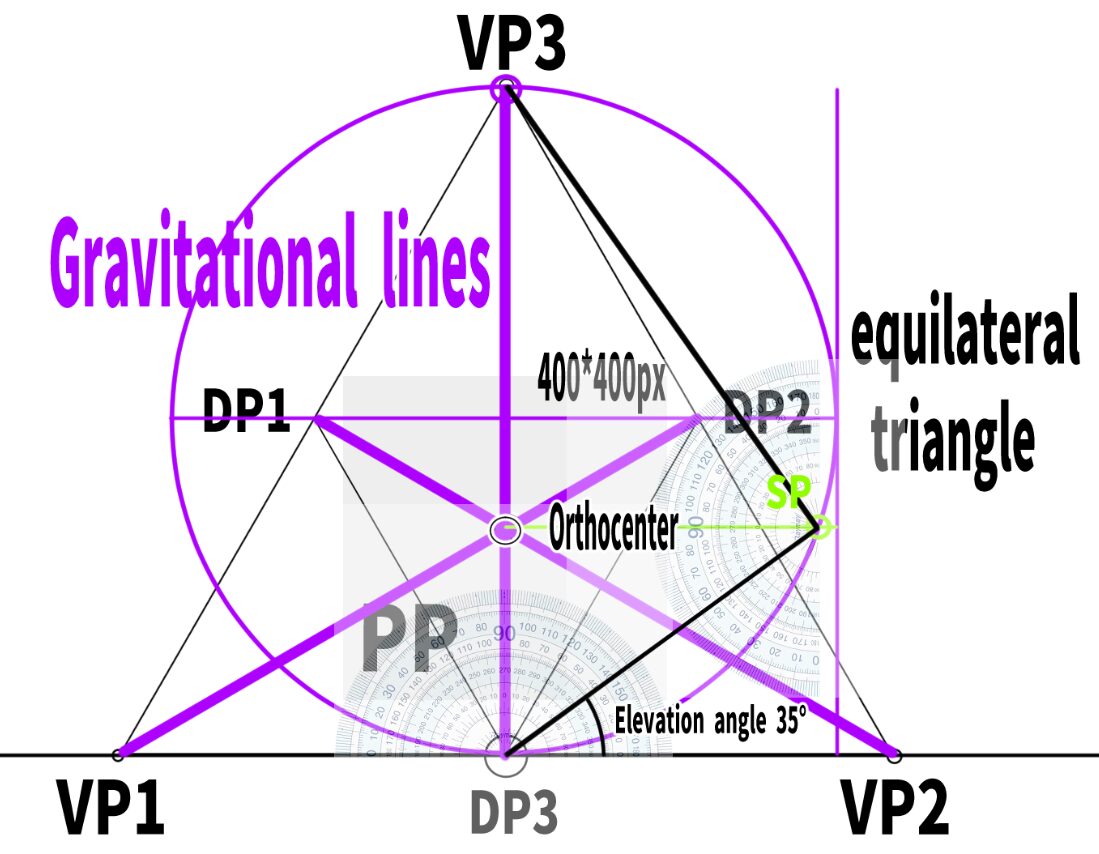
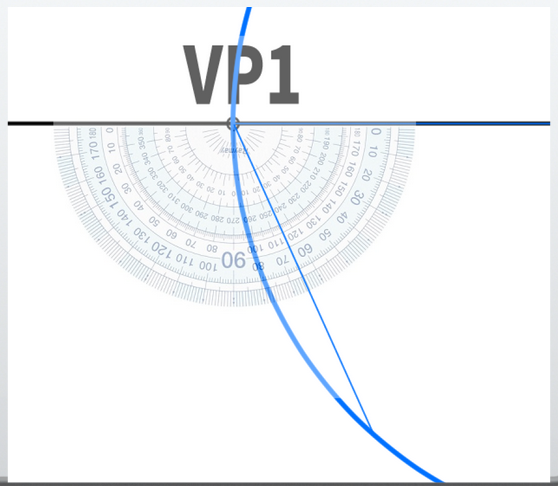
For example, in the case of the earlier equilateral triangle, since it is a low-angle perspective, it results in an elevation angle, and when measured, it turns out to be 35°.
What happens once the elevation angle is determined will be left for later. Also, the reason why the angle between DP3 and SP is the elevation angle will be postponed for now.
How to find the third vanishing point
How does the observer perceive the scene in front of them?
 First, set the two vanishing points at the ends. In other words, these will be VP1 and VP2. The problem is where to place the upper and lower vanishing point, VP3. This is more about how to set it, rather than right or wrong.
First, the key point is how the observer is viewing the scene in front of them.
- Are they looking up or looking down?
- What are the angles of elevation or depression?
This part is something that can still be understood.
Next, if a cube is positioned either above or below you, at what angle does it appear to be tilted?
This is the difficult part. It’s hard to understand why this needs to be known in the first place.
Thought experiment for understanding angles in three-point perspective
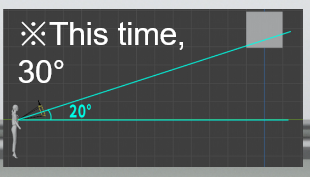
For example, let’s conduct a thought experiment: If we look at this cube and the observer from directly above, at what angle does the cube appear to be tilted?
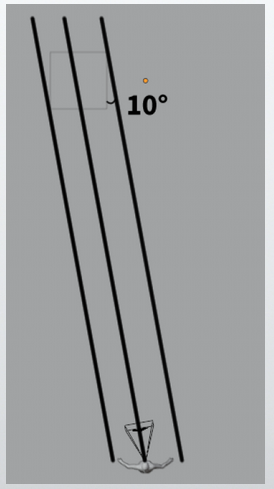
When a straight line is drawn from the observer and the angle is measured, it was about 10 degrees. In Blender terms, this means the camera is tilted 10 degrees to the left along the Z-axis.

Now, what is the angle of elevation? By measuring the angle from the side view, we can determine it. In Blender terms, this means the camera is tilted 20 degrees vertically (pitch rotation) from 90 degrees.
This seems to represent the concept of the vanishing point in the side view.
Here is the case of the screen with an elevation angle of 20 degrees and a horizontal tilt of 10 degrees.
Below is the case with an elevation angle of 0 degrees (90 degrees) and no horizontal tilt.
From this, we can understand that the previously visible cube will only appear on the screen if it is looked up.
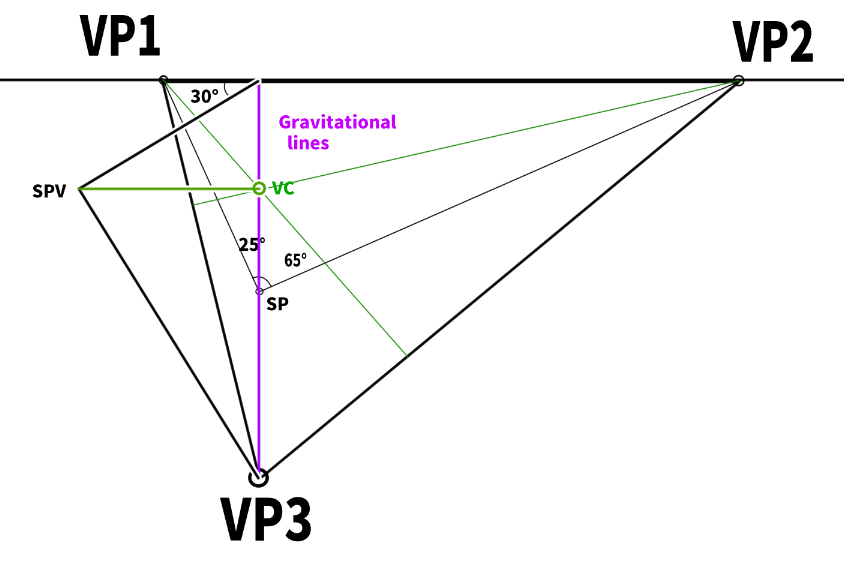
How to find the third vanishing point in three-point perspective
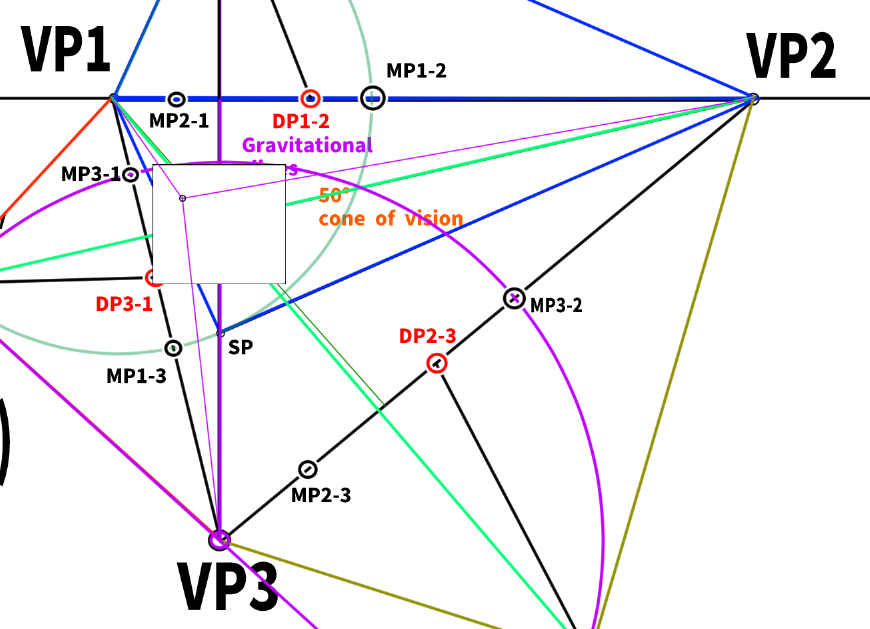
Let’s find the position of VP3. First, construct a circle with the length from VP1 to VP2 as its diameter. A semicircle would work as well.
For example, to apply a 25-degree rotation (yaw), draw a line from VP1 in the direction of 65 degrees until it touches the semicircle (90 – 25 = 65).

When constructing a triangle like this, it will result in exactly 25 degrees (the sum of the internal angles of a triangle is 180 degrees).
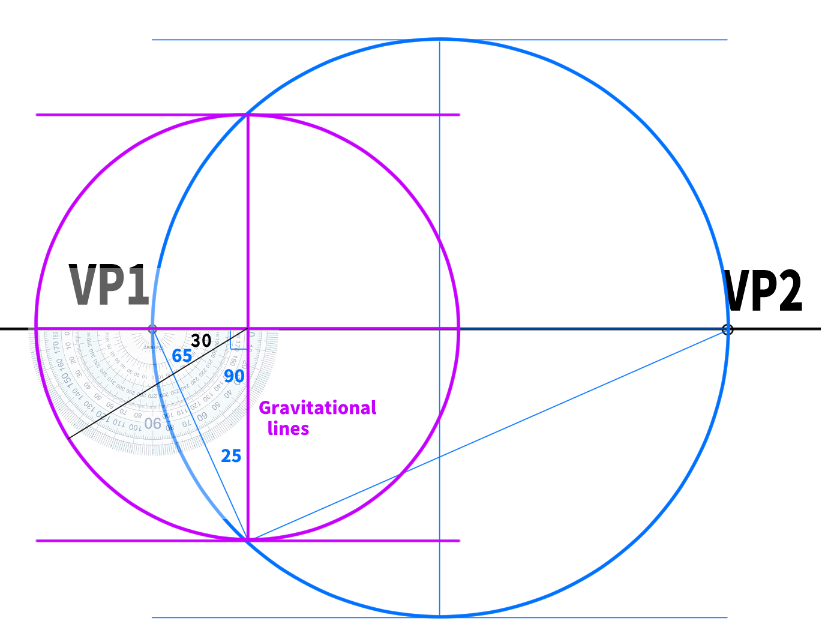
Using gravitational lines, we will create a 30-degree downward angle. Draw a line in the 30-degree direction with the same length as the gravitational line.
The length of the line is determined by constructing a circle using the length of the gravitational line.
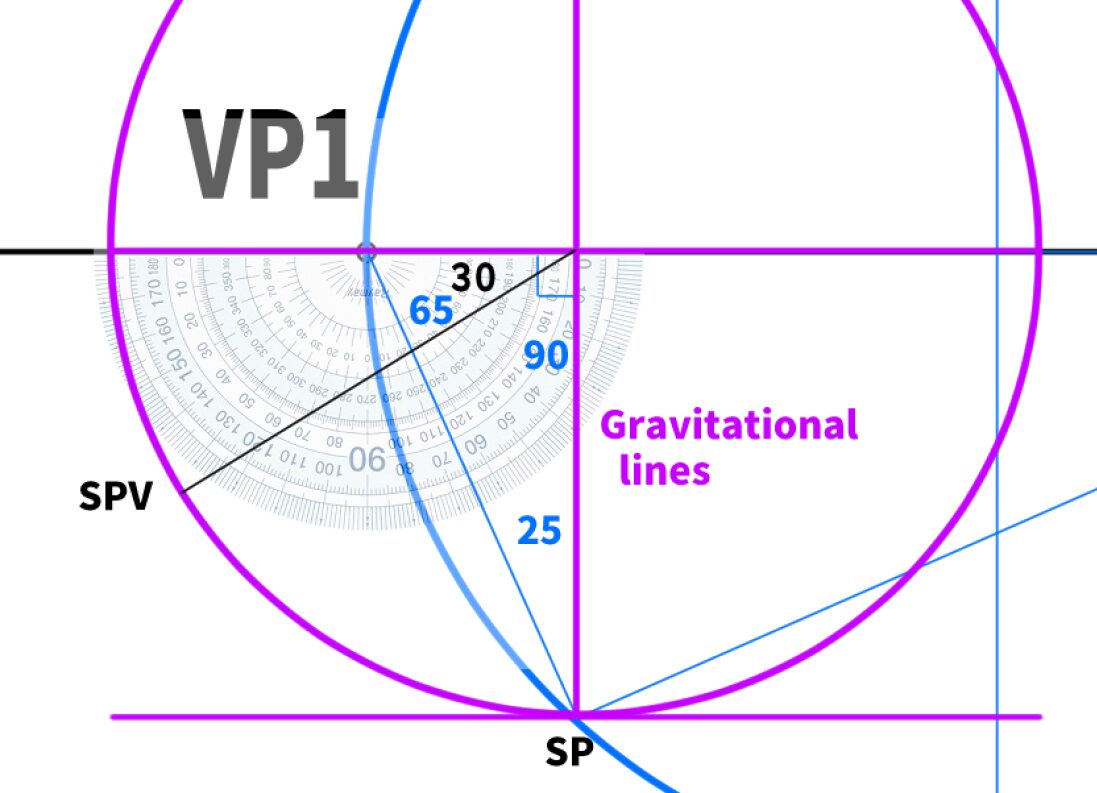
The point where the line is drawn becomes the vanishing point in the side view.
It is easier to understand if you imagine the side view we saw earlier in Blender.
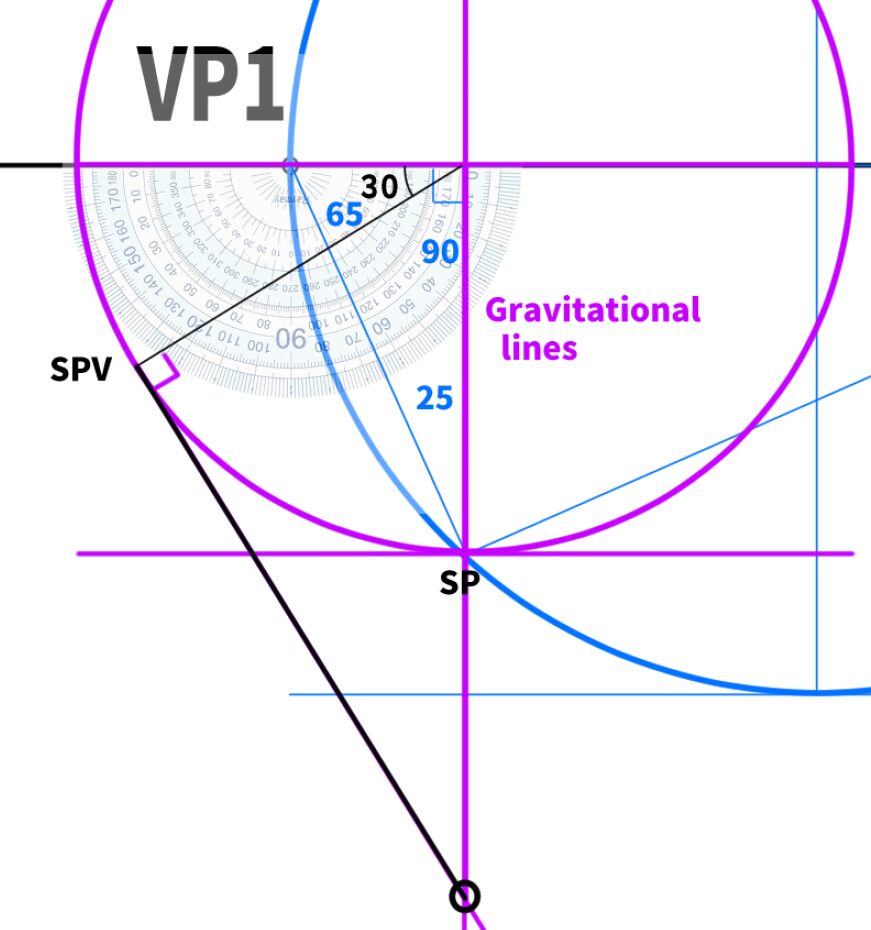
From SPV, extend a vertical line, and the point where it intersects with the gravity line seems to be VP3.
When constructing the triangle for the three-point perspective, it looks like this. While it’s possible to create any sharp-angled triangle, it requires the skill to consider the angle at which you want to view the object when constructing the perspective.
In other words, it moves beyond the realm of right or wrong into the realm of sense and aesthetic judgment.
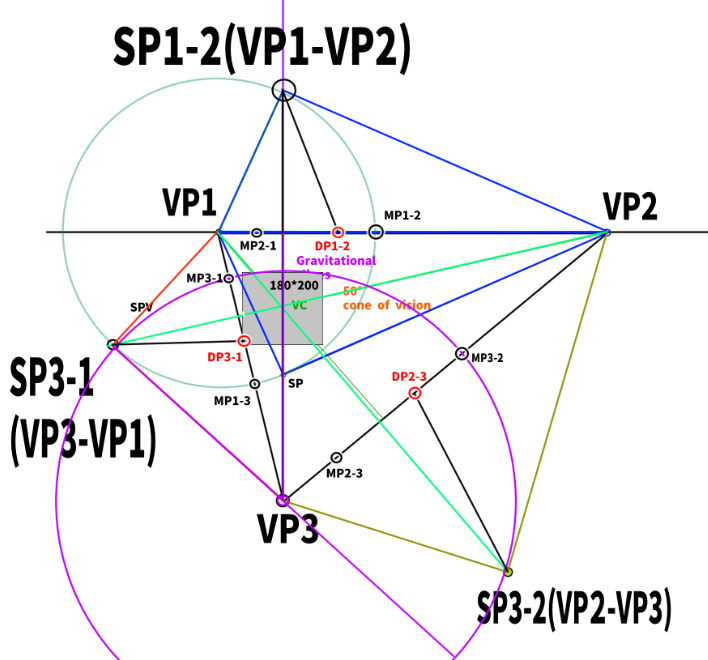
How to Determine the Cone of Vision in Three-Point Perspective
How to construct the cone of vision in three-point perspective
Knowing the three vanishing points alone is not enough to draw a picture. You must also establish the picture plane (PP, canvas).
To set up the picture plane, it’s necessary to understand the range where distortion does not occur. In other words, we need to understand the natural Cone of Vision for human perception.
POINTCone of Vision (COV):In perspective drawing, this refers to the range of vision within which objects appear natural to the human eye, without noticeable distortion.
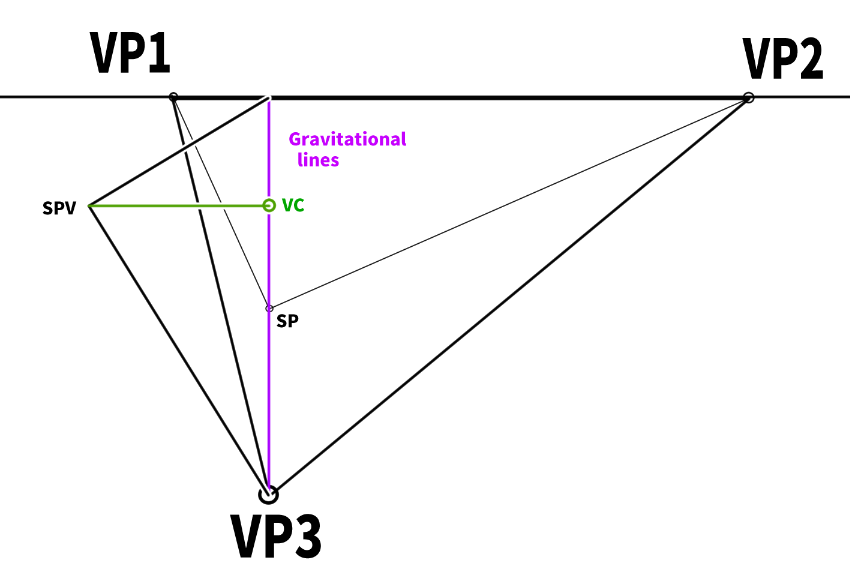
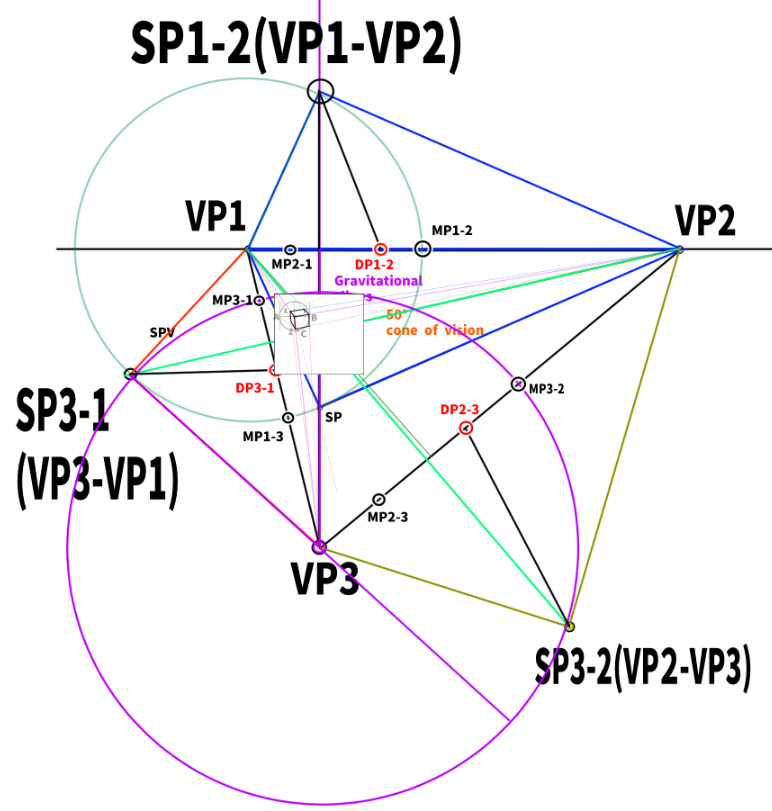
First, extend a horizontal line straight from the previously determined SPV, and find the point where it intersects with the gravity line. This point becomes the Visual Center (VC).
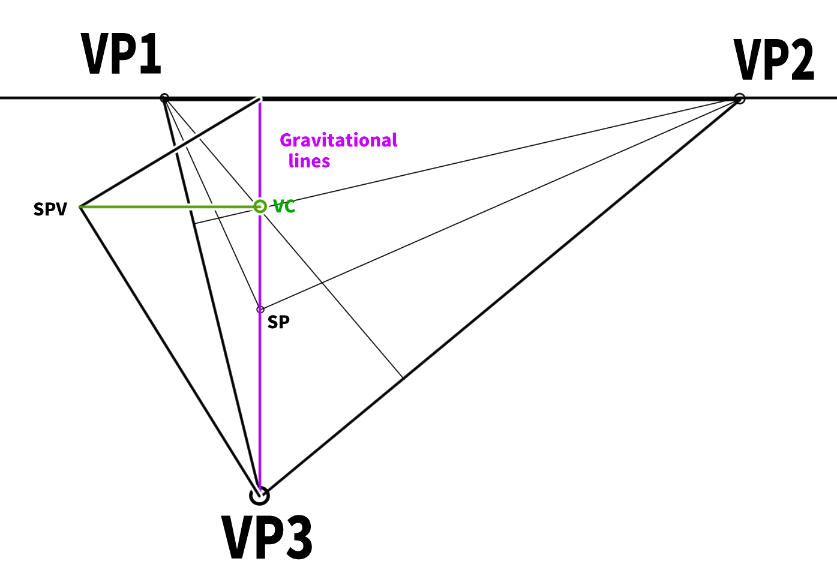
Incidentally, this VC is the orthocenter of the triangle formed by VP1, VP2, and VP3.
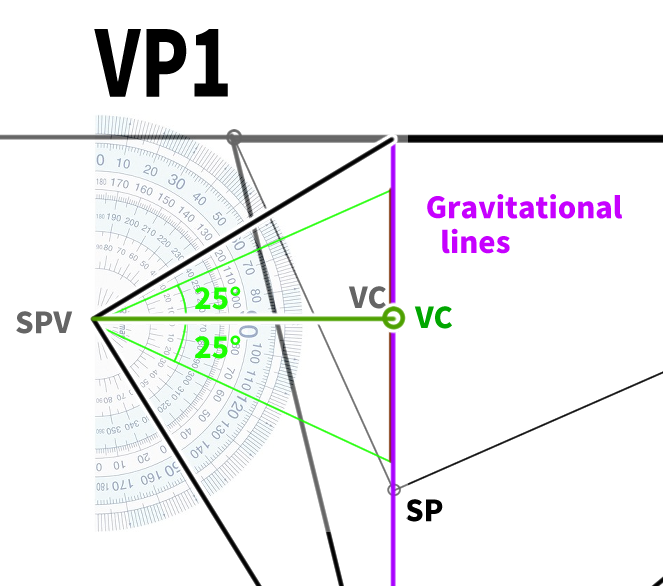
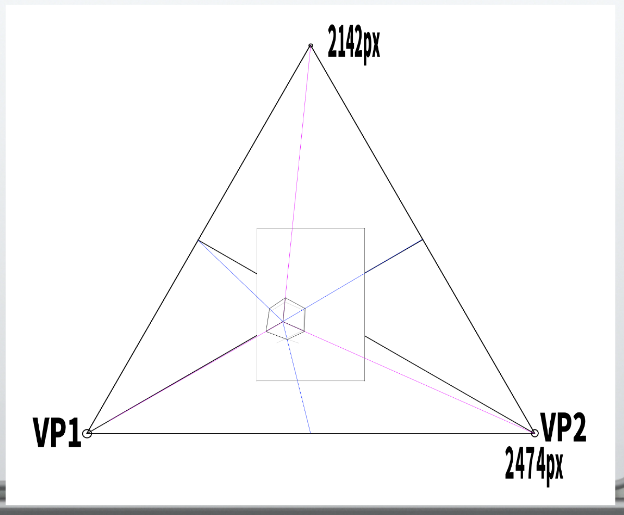
In the case of three-point perspective, we learned in a previous video that the cone of vision should be kept within 60 degrees. This time, we’ll construct it using 50 degrees.
By extending lines 25 degrees to the left and right from the SPV (Side-view Station Point), we can form a cone of vision totaling 50 degrees.
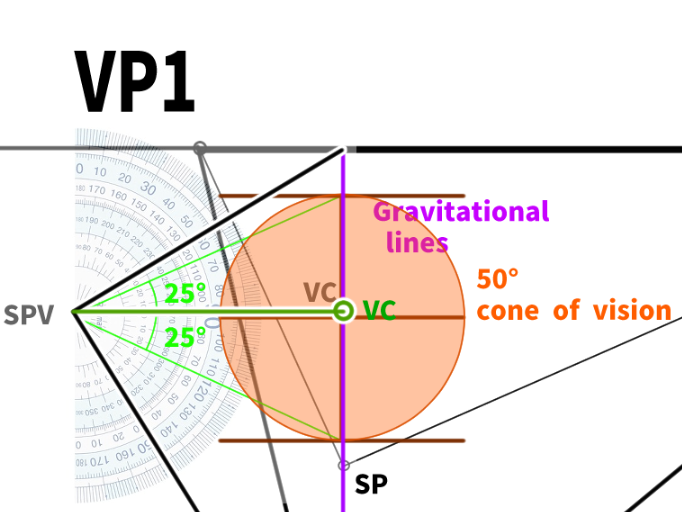
Then, based on this diameter, we will construct the cone of vision.

Finally, if we construct the screen within this cone of vision, the process will be complete.
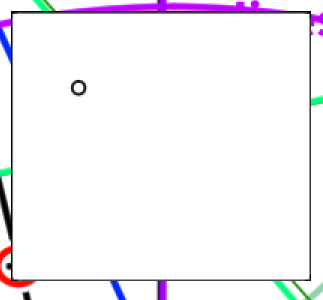
For example, I constructed the screen like this (180*200px). If you want to make the screen larger, you can increase the distance between VP1 and VP2 (for this case, it’s 960px).
There may be people who don’t fully understand what’s going on and feel that this is a tedious task to do every time. I agree.
However, it’s important to go through the process at least once. Once you’ve constructed a versatile canvas, you can reuse it in the future.
For example, if you want to make an A4-sized 595*842 canvas (PP), how should you set the vanishing points?
To be honest, the exact calculation is still unclear. However, simply put, it might be enough to multiply this (960px) by about five times.
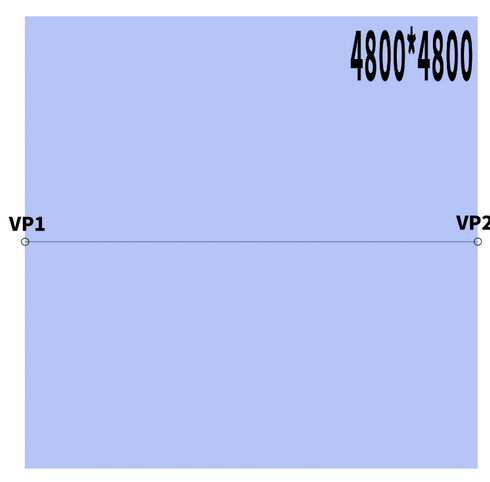
In other words, let’s assume that the distance between VP1 and VP2 would be 4800px. If this were an analog scenario, perhaps thinking in centimeters would be helpful (of course, the numbers would be smaller in centimeters).
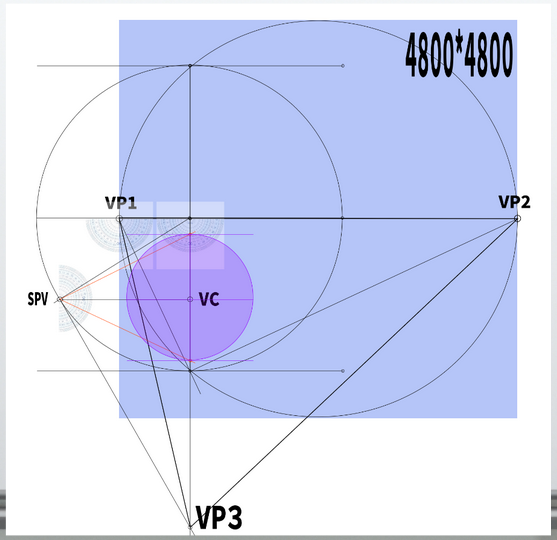
Now, from here on, it follows the same steps as before, so I will skip over them. Since this is a test, I created the angles quite roughly.
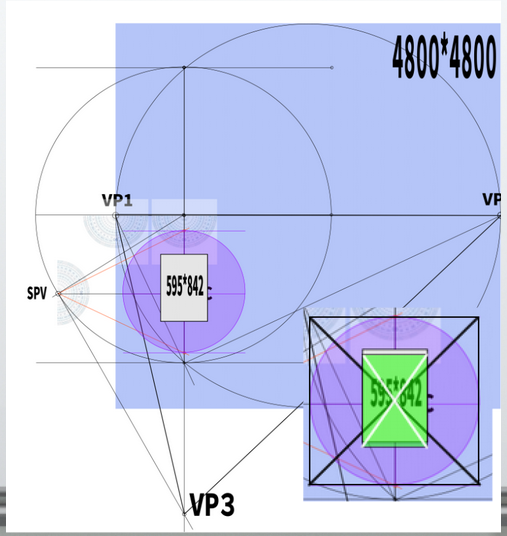
Let’s try constructing the A4-sized PP based on this cone of vision (50 degrees). It fit comfortably, so maybe a slightly smaller size would have been fine.
Also, it’s better to position the PP so that its center aligns as closely as possible with the visual center, as this helps achieve better balance (though in the diagram on the right, it’s not centered).
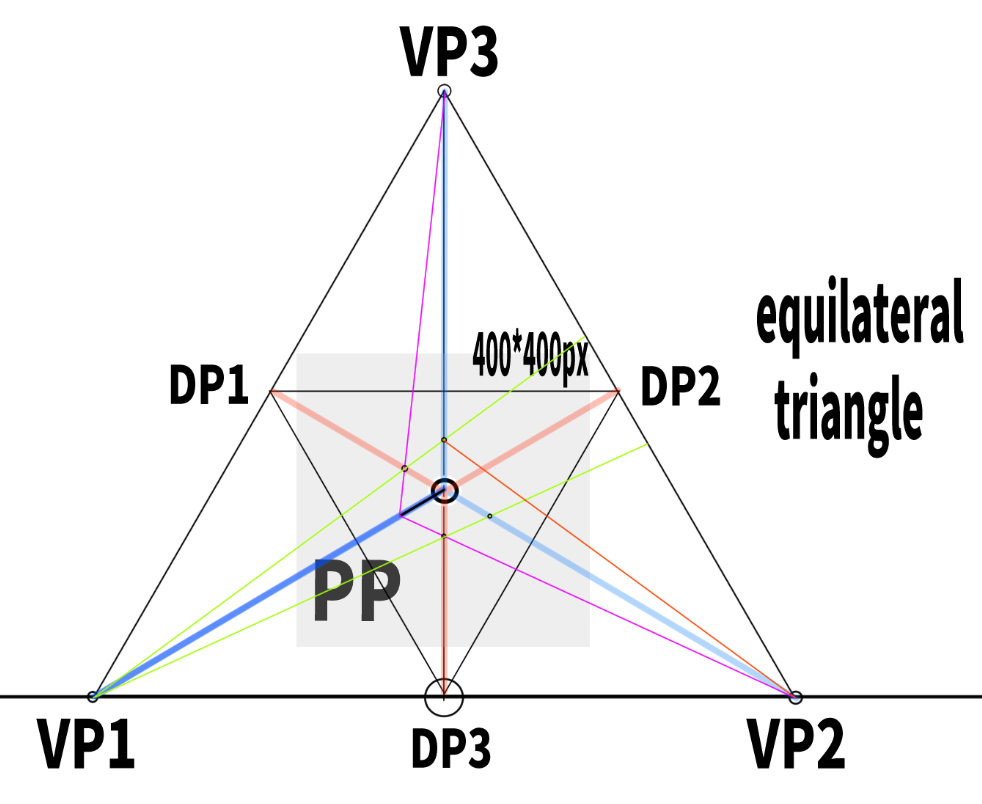
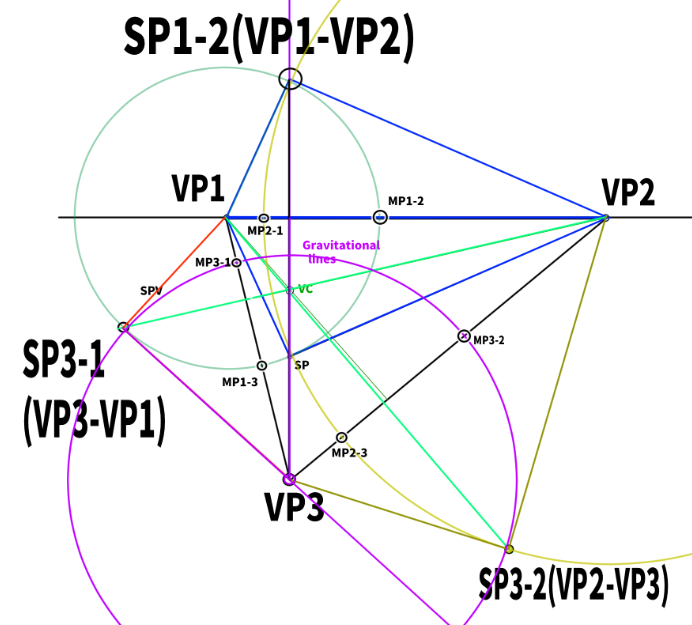
How to Find the Measuring Point and the Diagonal Vanishing Point in Three-Point Perspective
How to find the measuring point in three-point perspective
We have learned how to construct a regular cube in three-point perspective using an equilateral triangle. However, we have not yet explored how to construct cubes based on other types of triangles.
Moreover, it’s not the case that any triangle can be used. It must specifically be an acute triangle — a triangle in which all three interior angles are less than 90°.
To construct a cube, it’s necessary to identify the Measuring Point (MP) and the Diagonal Vanishing Point (DP).
This part is a bit tricky — actually, it’s the most difficult to understand so far.
We’ll use the same diagram as before. The elevation angle is 30°, with 25° to the left and 65° to the right.
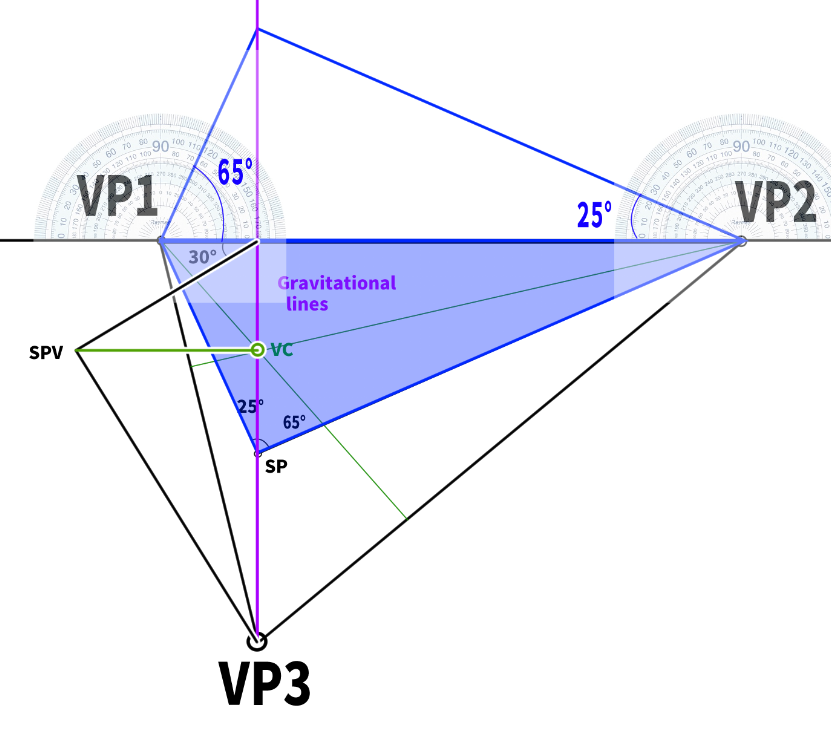
First, we create an upside-down version of the blue triangle above.How?
Start by extending the vertical gravity line upward.
Then, draw lines at a 65-degree angle to the left and a 25-degree angle to the right from this extended line.
These lines will intersect the gravity line and form an inverted triangle.
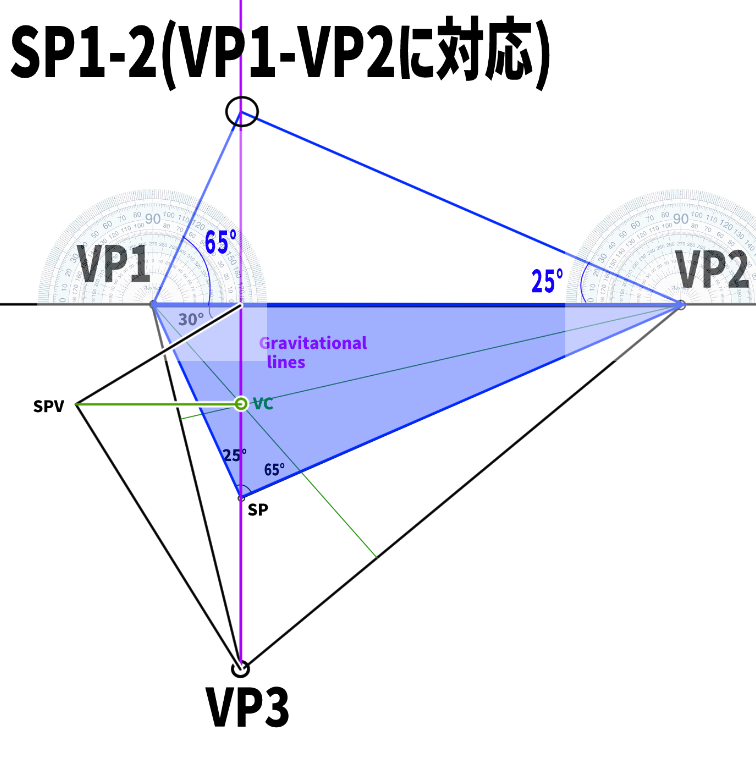
Let’s call the new point SP1-2.
Why is this point considered a standing point (SP)?
We’ll leave that question aside for now and move on.
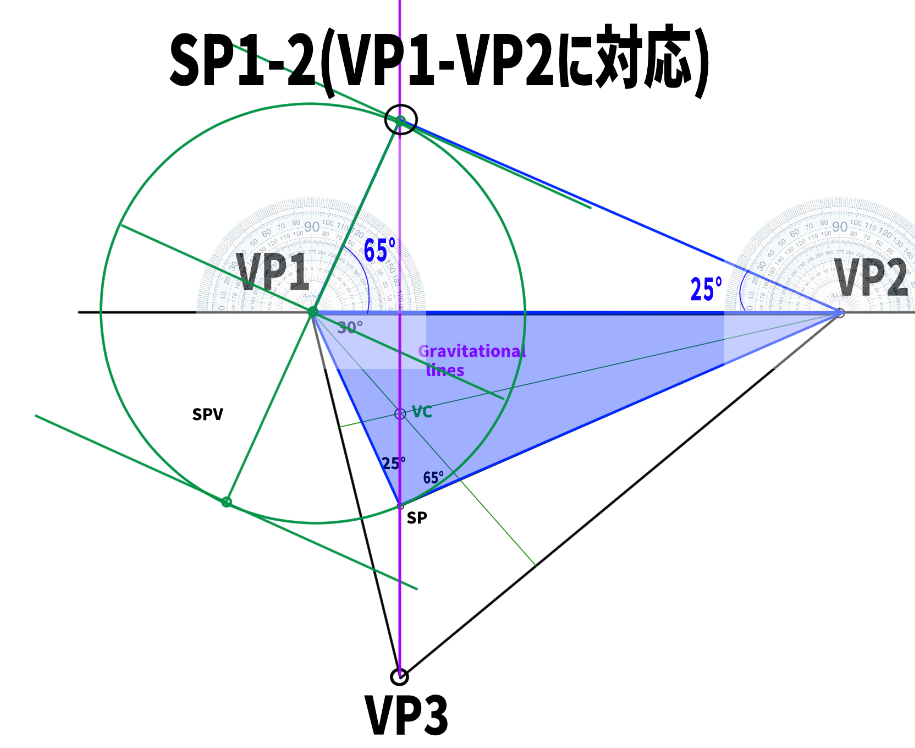
Next, use the distance from VP1 to SP1-2 to construct a perfect circle.
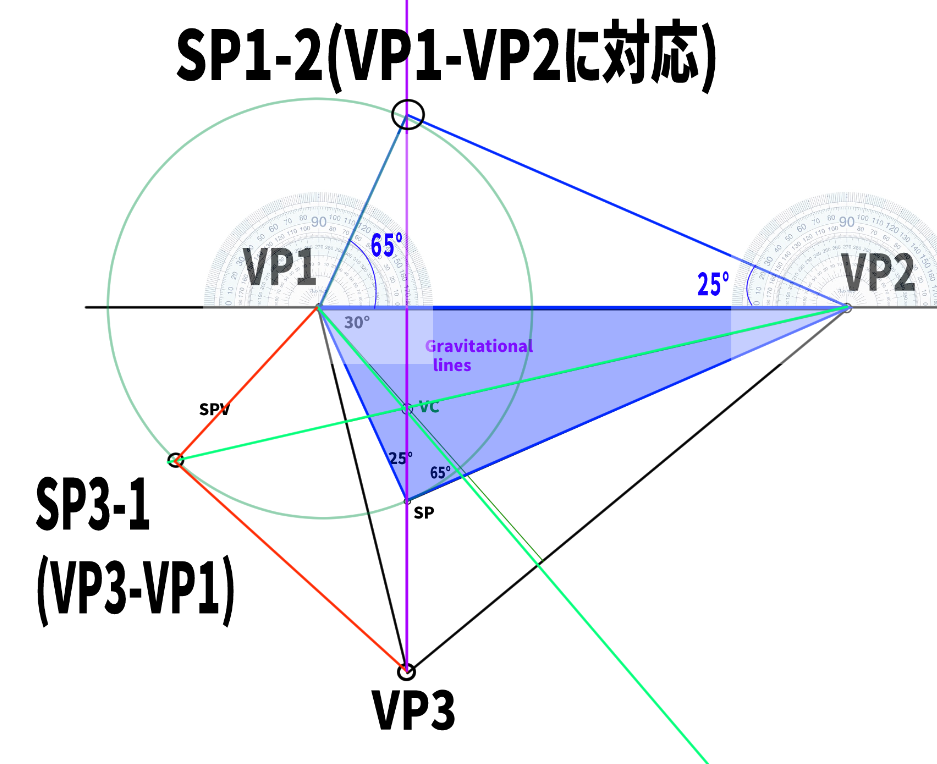
Extend a line from VC and find the point where it intersects the circle. This point will be SP3-1 (corresponding to VP3–VP1).
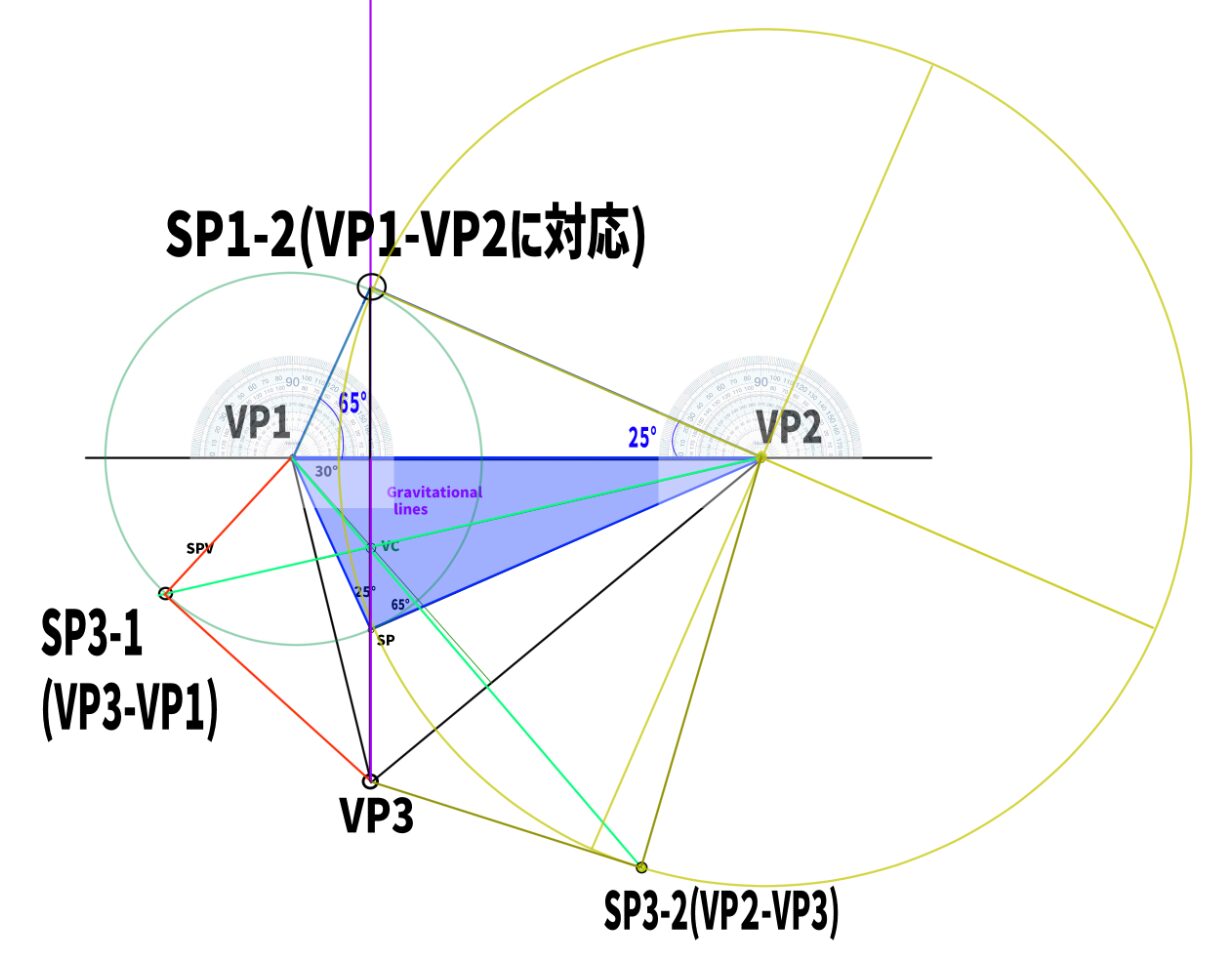
Find SP3-2 in the same way.
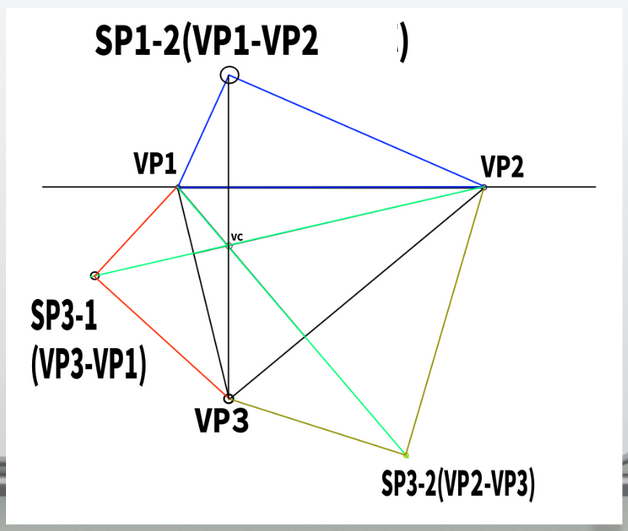
Once we simplify the diagram, it looks like this
From here, we will begin to locate the measuring points.
POINTMeasuring Point (MP):A point that serves as an additional, auxiliary vanishing point.
It is placed along a specific vanishing line (typically the horizon line) and is used to accurately measure dimensions in perspective drawings.
In short, it’s a point that is necessary when drawing a perfect cube in perspective.
To find the measuring point, it seems we need to draw one more circle.
It may feel tedious, but thankfully it’s not as incomprehensible as abstract math — so it’s relatively easy to follow.
Construct a circle using the distance from SP3-1 to VP3 as the diameter.
From here, we will find a total of six lines that touch the circle.
Although I don’t fully understand the principle of why that point becomes the MP, I’ll start by getting used to the process.
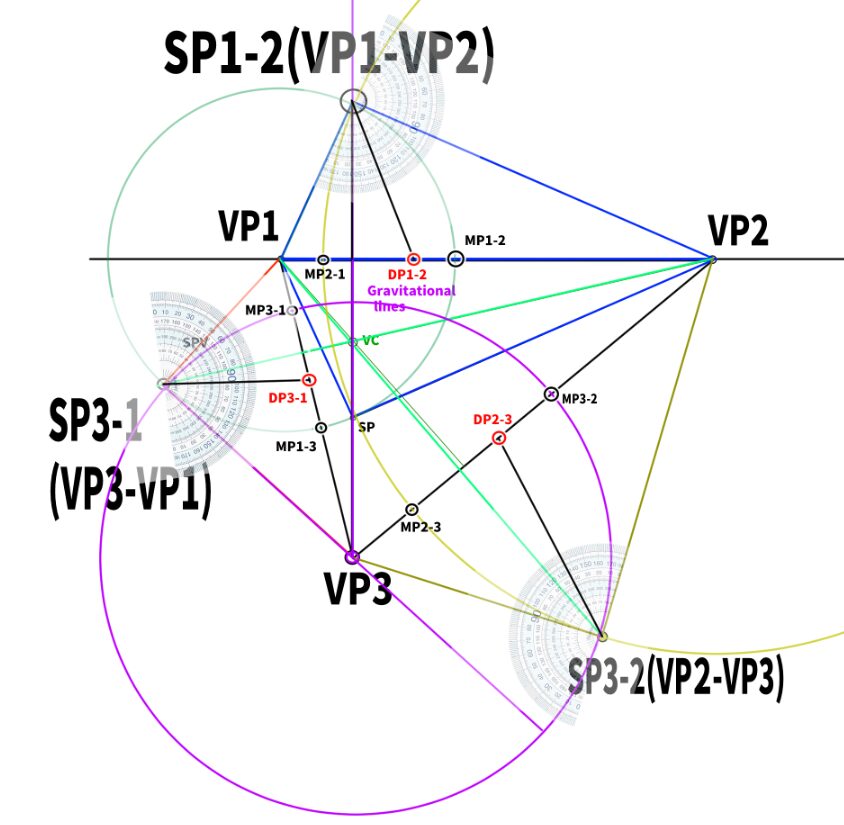
Next, we will find the vanishing points of the diagonals (DP).
From each SP, the position where the line is extended at exactly half the angle seems to be where the DP will be.
In other words, it will be at the 45-degree position.
With this, the positions of DP1-2, DP2-3, and DP3-1 can be determined.
【Application】Creating a Correct Cube with the Three-Point Perspective of Other Triangles
How to construct a cube using the measuring point in three-point perspective

In the previous section, we learned how to understand the Measuring Point (MP) and the Vanishing Point of Diagonals (DP) in three-point perspective.
Now, using these MP and DP, we will proceed to construct a correct cube.
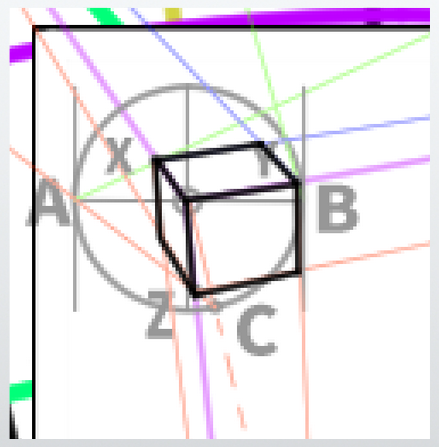
The diagram we created earlier is shown here. Now, we will construct the appropriate screen.
This will also use the same screen structure we created in the previous section.
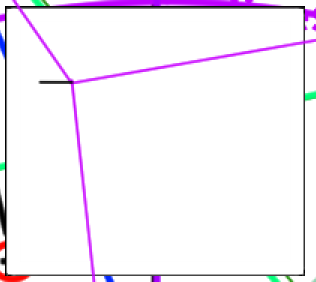
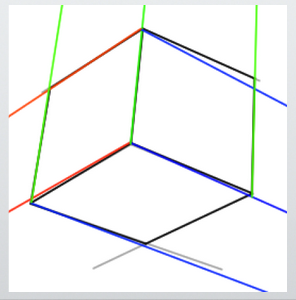
First, place the center point of the cube you want to draw inside the PP arbitrarily. For example, let’s place it here.
From the center point, extend lines towards each vanishing point.
Next, construct an arbitrary straight line either horizontally or vertically. For example, let’s construct a cube with edges of this length.
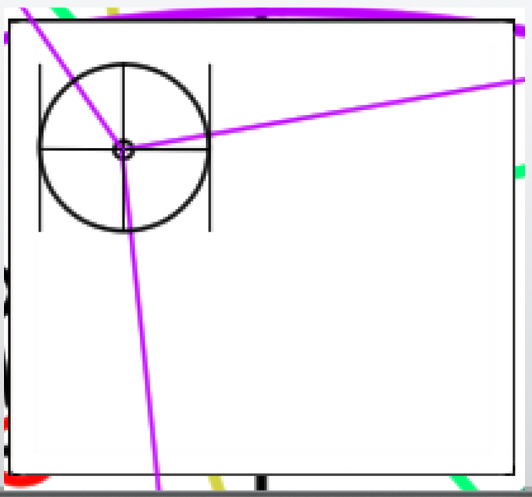
Construct a circle with the drawn length as its radius.
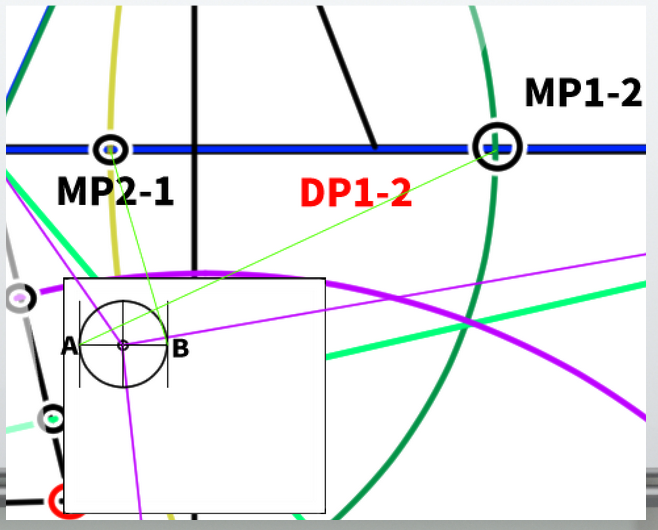
Extend a line from A to MP1-2, and a line from B to MP2-1.
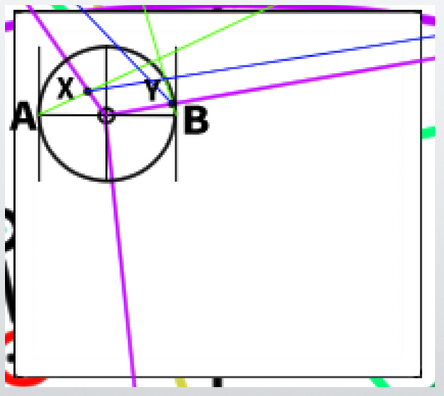
Let the new intersection points formed by extending the lines be X and Y. Then, extend the lines from X to VP2 and from Y to VP1, crossing each other.
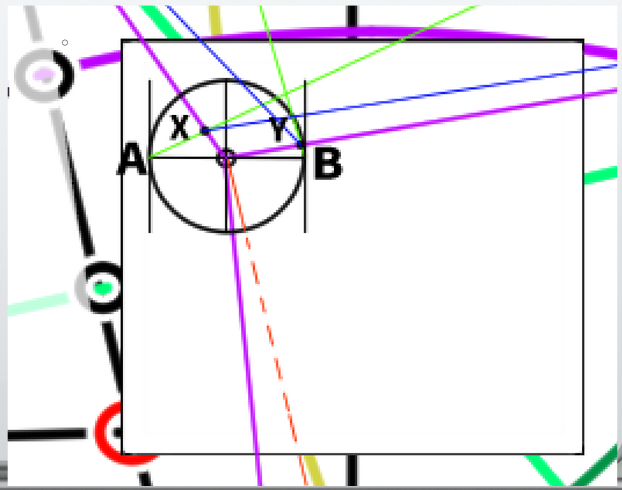
Next, extend a line from the center of the circle to its edge. The angle of this line should be parallel to the line connecting VP1 and VP3.
You can use a protractor or other tools to measure the angle for a more accurate drawing.
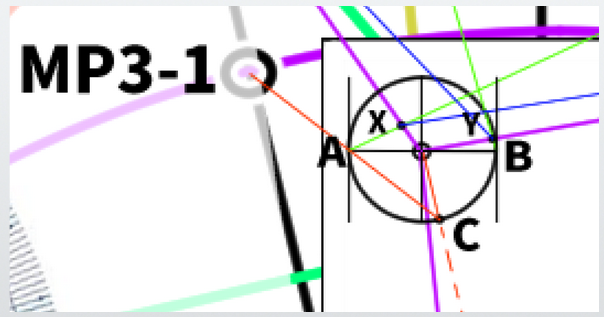
The point where the line touches the circle is called C. From point C, extend a line further towards MP3-1.
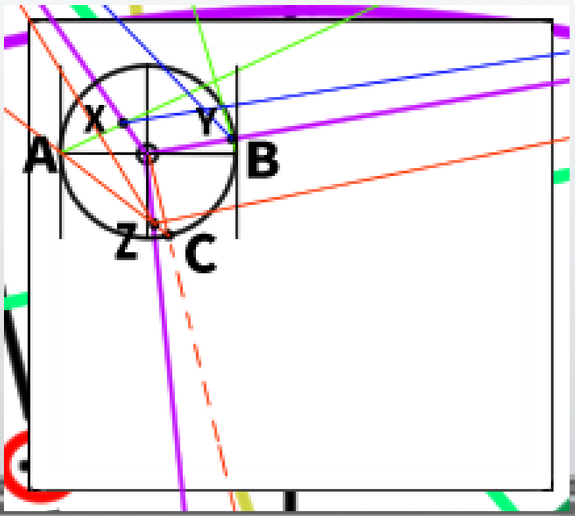
The newly created intersection is called Z. From point Z, extend lines further towards VP1 and VP2.

Additionally, extend lines from X and Y towards VP3.
Finally, just connect each intersection point to complete the cube.
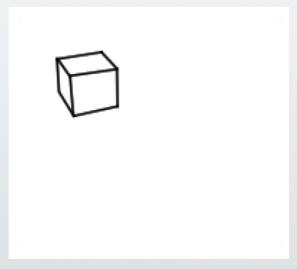
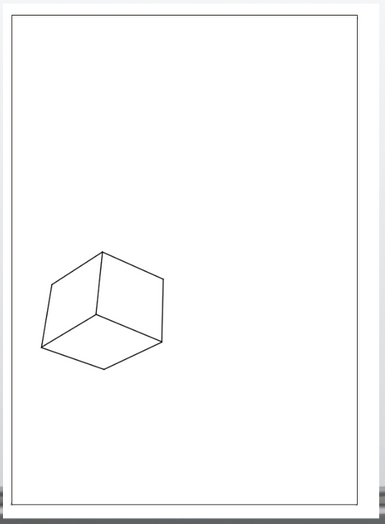
The completed cube looks like this when displayed neatly. Despite roughly constructing the perspective, the cube turned out quite well.
Creating a cube may take several times the area and effort, which can be challenging.
However, it’s worth learning the analog method as well.
Additionally, once this perspective technique is created, it can be reused.
[Advanced] Creating a Three-Point Perspective Grid
How to roughly use three-point perspective with a grid
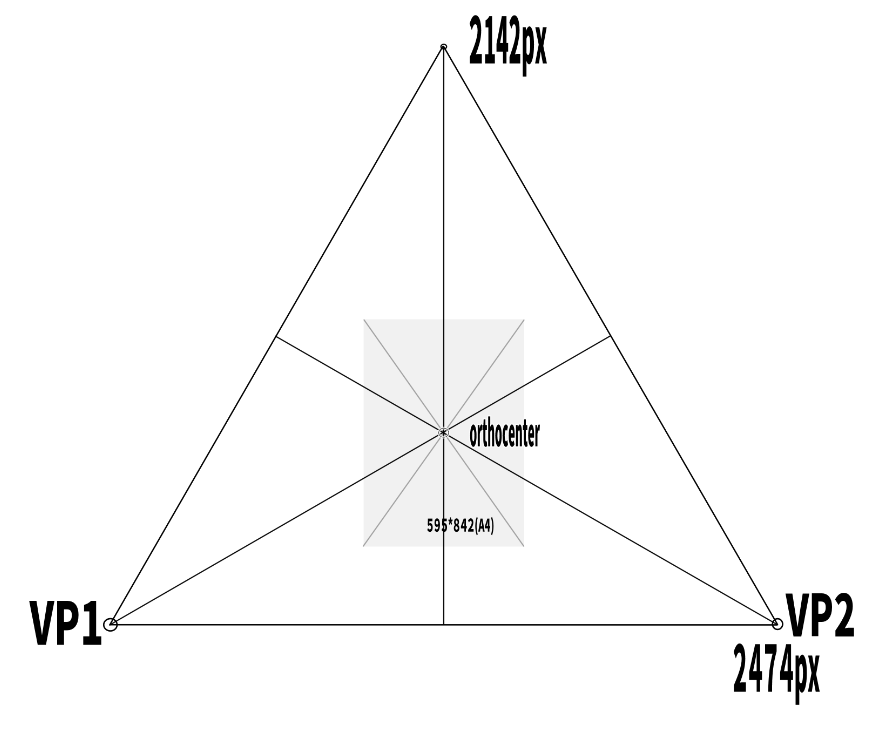
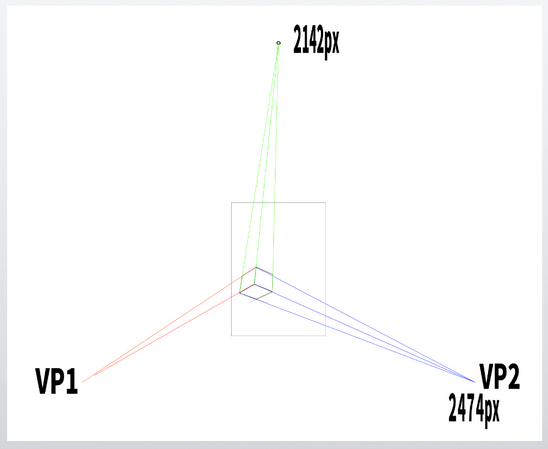
This time, I constructed an equilateral triangle so that A4 size appears on screen.
If one side is 2474 px, then the height becomes (√3 / 2) × 2474 ≈ 2142 px.
A smaller equilateral triangle might also work, but for now I used the same numbers as in the two-point perspective example.
Without considering the cone of vision in detail,
we assume that distortion will be minimal if the triangle fits comfortably within the frame.
However, the orthocenter should be positioned as close as possible to the center of the picture plane (PP).
In the case of an equilateral triangle,
the orthocenter appears at about one-third the total height
(2142 × 1/3 = 714).

Next, we create a rough grid over the A4-sized area.This time, we’ll make a 4×4 square grid.
It doesn’t have to be precise.
By drawing diagonal lines across each rectangle, you can find the center, which gives you the halfway height.
Of course, you can also use a ruler if you prefer.
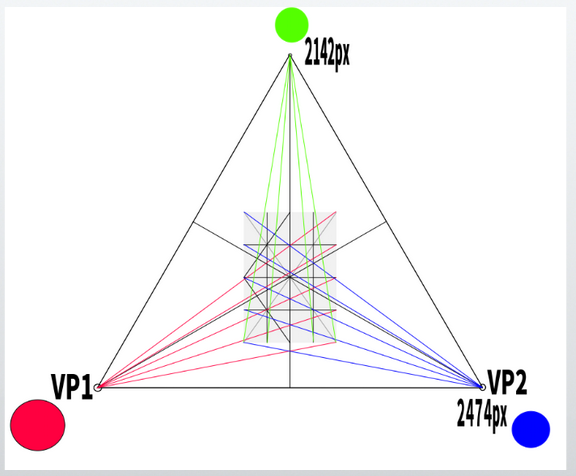
Finally, draw lines from each vanishing point toward each section of the grid.
When the layout is cleaned up, it looks like this.

Rather than using the grid lines themselves,
think of them as a reference for the angles of the lines.
For example, let’s say you want to draw a cube around this area.
Place a circle there.
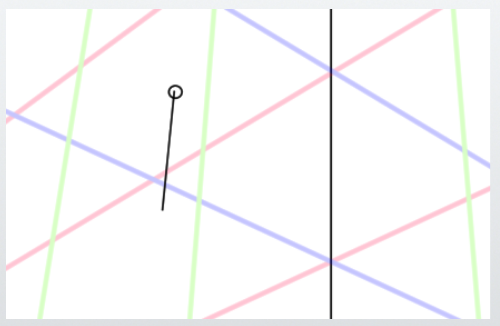
From there, draw a line downward somewhat arbitrarily.
For the downward line, use the green grid line (VP3 line) as a reference and roughly extend it downward.
The key point is to make it similar to the nearby green line, giving it a parallel-like feel.
Draw lines to the left and right, using the grid as a reference.
Since we’re not drawing a cube this time, the length can be arbitrary.
Finally, just connect the lines casually, and you can construct a cube that looks like it’s done with three-point perspective.
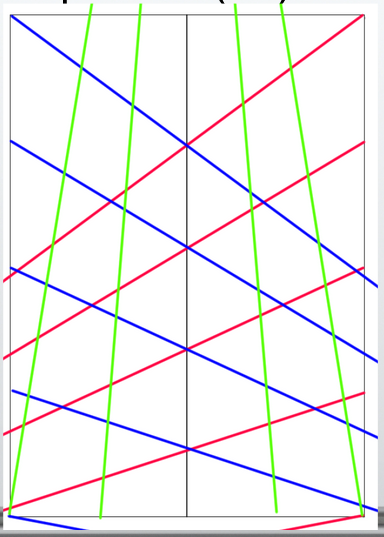
If you draw more grid lines, you can achieve a more accurate approximation.
For example, 32 squares would give a more accurate sense of perspective compared to 16 squares.
Here is the cleaned-up version.
It might be useful when you want to roughly sketch a building or make a quick reference.
By the way, if you draw more accurately, it will look like this, but there isn’t much difference.
When you properly construct a cube, it will look like this.
References
Books that are easy for beginners to understand
David Chelsea「Extreme Perspective! For Artists: Learn the Secrets of Curvilinear, Cylindrical, Fisheye, Isometric, and Other Amazing Drawing Systems that Will Make Your Drawings Pop Off the Page 」
The book contains many illustrations and is easy to understand. It also explains basic perspective terminology and provides a simple explanation of how to use perspective. However, it is important to note that the book focuses on ‘illustration (manga)’ rather than architectural perspective.
It is suitable as the first book to pick up for learning the basics of perspective in general.
Robbie Lee「Perspective Made Easy: A Step-by-Step Guide」
Robbie Lee「Perspective Made Easy: A Step-by-Step Guide」
This is a suitable book to pick up as the first one for learning the basics of perspective in general.
I found it to be simpler and more detailed than ‘Perspective! Learn Perspective Through Manga.’ Therefore, I especially recommend this book to beginners as their first read.
Scott Robertson「How to Draw: drawing and sketching objects and environments from your imagination」
Scott Robertson「How to Draw: drawing and sketching objects and environments from your imagination」
A book specialized in drawing, particularly focused on line art. Though somewhat complex, it provides a broad and in-depth explanation.
About the Japanese version of this article
This article is a translation of an article written in [https://souzoulog.com/2024/12/26/basic-of-perspective-8/]. For detailed references, please refer to this link.

Comments